Willis Wall Blue Christmas 2016
It's time for the annual Willis Wall Holiday video. This past year film was gathered at Mt. Rainier, Mt. Baker, Glacier Peak, Channel Islands and the North Cascades. Lots of bike trips! Happy Holidays to everyone!
CELEBRATE THE OUTDOORS
40 years outdoors experience, extensive info on Mt. Rainier’s Wonderland Trail, original music, equipment reviews, off trail videos, other peaks in Mt. Rainier NP
It's time for the annual Willis Wall Holiday video. This past year film was gathered at Mt. Rainier, Mt. Baker, Glacier Peak, Channel Islands and the North Cascades. Lots of bike trips! Happy Holidays to everyone!

Zimmerbuilt custom pack with detachable food bag
If one peruses prior posts here at williswall.com, mention of Zimmerbuilt custom packs came into play after ordering a few for myself and one for my daughter. Aside from a ski pack, these Zimmerbuilts have been the only pack to adorn my back for the last two years. I've found that I can make do with these smaller packs during the summer season when I don't have to carry more than about 3 days of food. However, this year I ordered what I might refer to as the "Ultimate Pack System" from Chris, consisting of three parts: main pack, detachable food bag, and front pack. Due to his schedule, Chris has been unable to deliver my front pack for this design as of yet, but I have substituted a front pack I received from him last year and this has worked out well. He did make me a custom sized pack strap camera pocket for those occasions when I didn't want to carry the front pack.
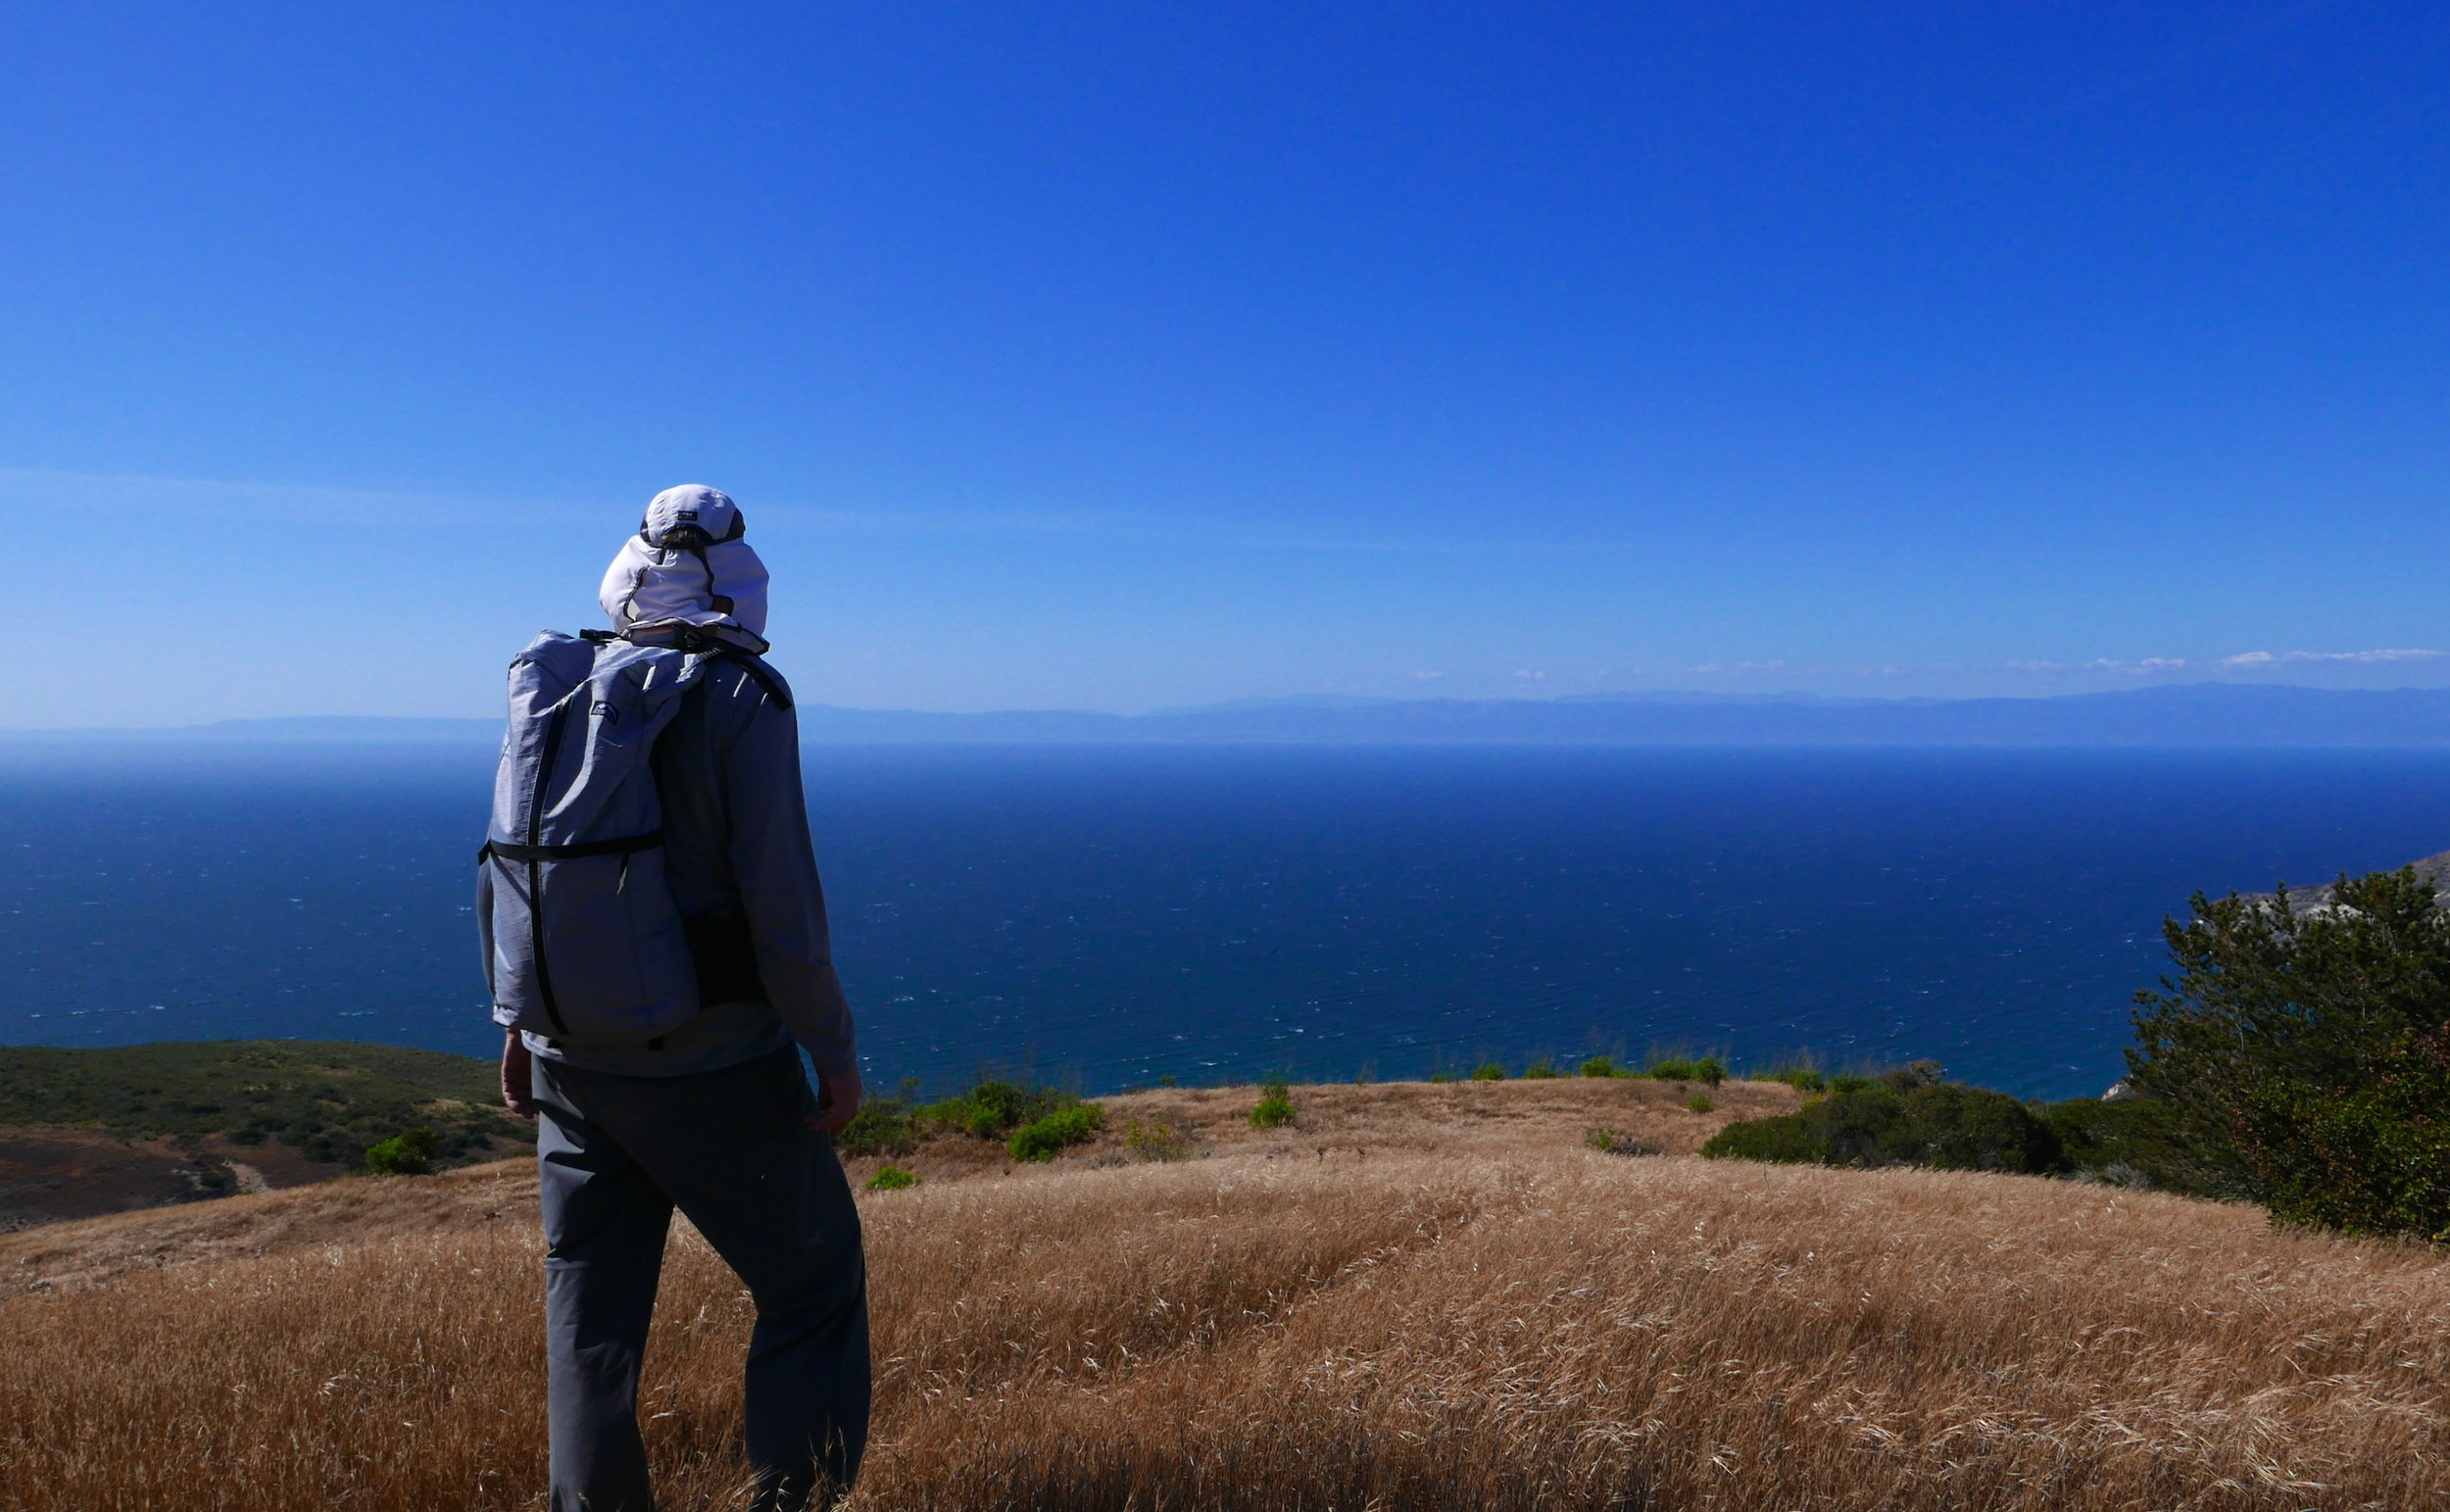
Zimmerbuilt pack on two day Channel Islands NP trip
I might call this newest addition a "movement pack." I spent a lot of time researching for an adventure racing pack, or ultra pack that I could buy off the shelf, so to speak. What I found were over engineered packs for my purpose...I am not adventure racing, so many of the extras were unnecessary. I just wanted as clean a pack as possible; no side water bottle pockets, no back pocket, nothing to catch on brush. I also wanted a pack that would hug my back, keeping the center of gravity inward. What I had made was a long, fairly wide but "flat" pack, only 4 inches deep. How many times have I wanted to access an item towards the bottom of any of my packs, and had to take crap out and lay it on the ground to be able to see or reach said item? To avoid this, I chanced a full length zipper in the middle of this pack, allowing me to find any item in the pack without having to remove stuff. When I say chanced, I knew the compromise this zipper would present; I could not stuff this pack with contents that would go into a regular tube, as the zipper becomes the weak point. This pack would need to be loaded accordingly, and with this limitation in mind I have had great success with it. While taking advantage of my back's real estate and keeping the depth at 4 inches, I have enough volume for myriad trips but the pack locks onto me, with absolutely no bounce, no sway and no noticeable effects on my center of gravity. The addition of a hip belt, only for the purpose of holding the pack in place and also incorporating two hip pockets, also helps with the utility. Here's a summary of observations after a season of use:

Zimmerbuilt basic pack for one day Enchantments Traverse
LIMITATIONS: carrying capacity, lack of side and back pockets, ventilation, zipper cautions (no overstuffing, fluids must be carried inside or on front pack

Zimmerbuilt Pack system loaded to the max (Glacier Peak)
BENEFITS: true back hugger, no sway or bounce, no protrusions to catch on branches or brush, versatility with the addition of food bag, simplicity
This year I did a fair amount of biking and this pack was on every trip. I did not use a front pack on the bike but still had access to my camera with the pack strap pocket. I did one trip where the pack system (all 3 components) were at their max, carrying 5 days of food, with no noticeable discomfort. Sometimes I strapped on the food bag and used it for fluids, extra clothing and other items for ease of access, as the pack still remained thin.
This system also worked well for a combo hike, where I biked for 9 miles then packed for 9, the latter part cross country for an overnight. What did I miss the most with this system? With no side pockets I either had to carry water in the pack or in the detachable food bag. Most of this time this was not a problem. I wish I had Chris put a pull tab on the bottom near the zipper to hold the pack in place when I was zipping up at full volume. Otherwise I am very happy with this configuration and am grateful there are still people out there that will do custom work. Needless to say working with Chris Zimmer is a pleasure, with excellent response to questions and impeccable workmanship.
bivy site on Mt. Rainier (Colonnade) on combo bike/hike with Zimmerbuilt pack and food bag

Zimmerbuilt custom pack with shoulder strap pockets (biking Rainier)

Upper Ptarmigan Ridge with the North Mowich Glacier, right (from 8670')
This was the last spot for me to hike on the Mt. Rainier Grand Tour, a self concocted trip forging up ridges and cleavers to afford astounding in-your-face views of Mt. Rainier's exquisite glacial topography. If done all at once as an orbit, the Tour entails 150 miles of hiking and 50,000 feet of vertical. However, you will do a bit more than that if taken in sections as I have done. This day trip turned out to be 15.5 miles with 4700 feet of elevation gain/loss. With tricky weather of late, I tried to take advantage of favorable conditions on Saturday September 24, hitting the trail at 7:45 AM after enduring the washboard road from hell to Mowich Lake. The weather held well enough but trended towards clouding up as the afternoon waned. However, I was able to summit Observation Rock (8376') with still open views; only the upper mountain was clouded over. After Observation I made my way up Ptarmigan Ridge to an obvious prominence and was rewarded with stunning vistas all around on the tiny summit, which my GPS put at 8670 feet. Like so many of the other points on the Tour, getting to these elevations allow one to gaze down upon the glaciers for intimate viewings of the world of rock and ice. Then just turn around and survey away from the mountain, picking out points passed on the Wonderland or climbed on the Tour. My objective in concocting the Grand Tour was to experience Mt. Rainier National Park both high and low, without the need for technical gear. I have hit every point on the Tour wearing trail runners (no microspikes or ice axe) and only aided by trekking poles or my ZPacks staff. Granted, on today's hike the Flett Glacier was a bit consolidated in the morning, so I crossed it twice on low angled spots, starting out climbing the ridge on the left, then right, and finally crossing over to Echo Rock and beyond. From that point I stayed on the rocks, scree, and pumiced marbles; just using the Flett Glacier would have been much easier, but I had already witnessed a booting skier slide into some rocks when he lost his footing, requiring some minor bandaging. My somewhat convoluted ascent and descent kept me off any hazardous angles. Complete photo set here.

Observation Rock (8376')
When I arrived at a saddle giving access to climbing Observation rock, a cold 20 knot wind necessitated donning 3 layers, a beanie and mittens. My clothing combo was perfect in that I was not cold and never came close to over heating while climbing. After Observation Rock I found Ptarmigan Ridge to be mild and low angled, making for a very pleasant ascent to the prominence. However, the tiny summit had me sitting down for most of my photography because of the airiness. I had left the option of climbing Echo Rock last but the clouds were moving in on the descent and I elected to save that summit for another day. Fog accompanied me from the bottom of the Flett until I reached lower Spray Park, and in the process I happened upon 3 mountain goats. We all exchanged looks and went about our business, and 11 hours after I set out I was back at my vehicle, ecstatic that I was able to finish the Tour before schedules and weather shut the door.
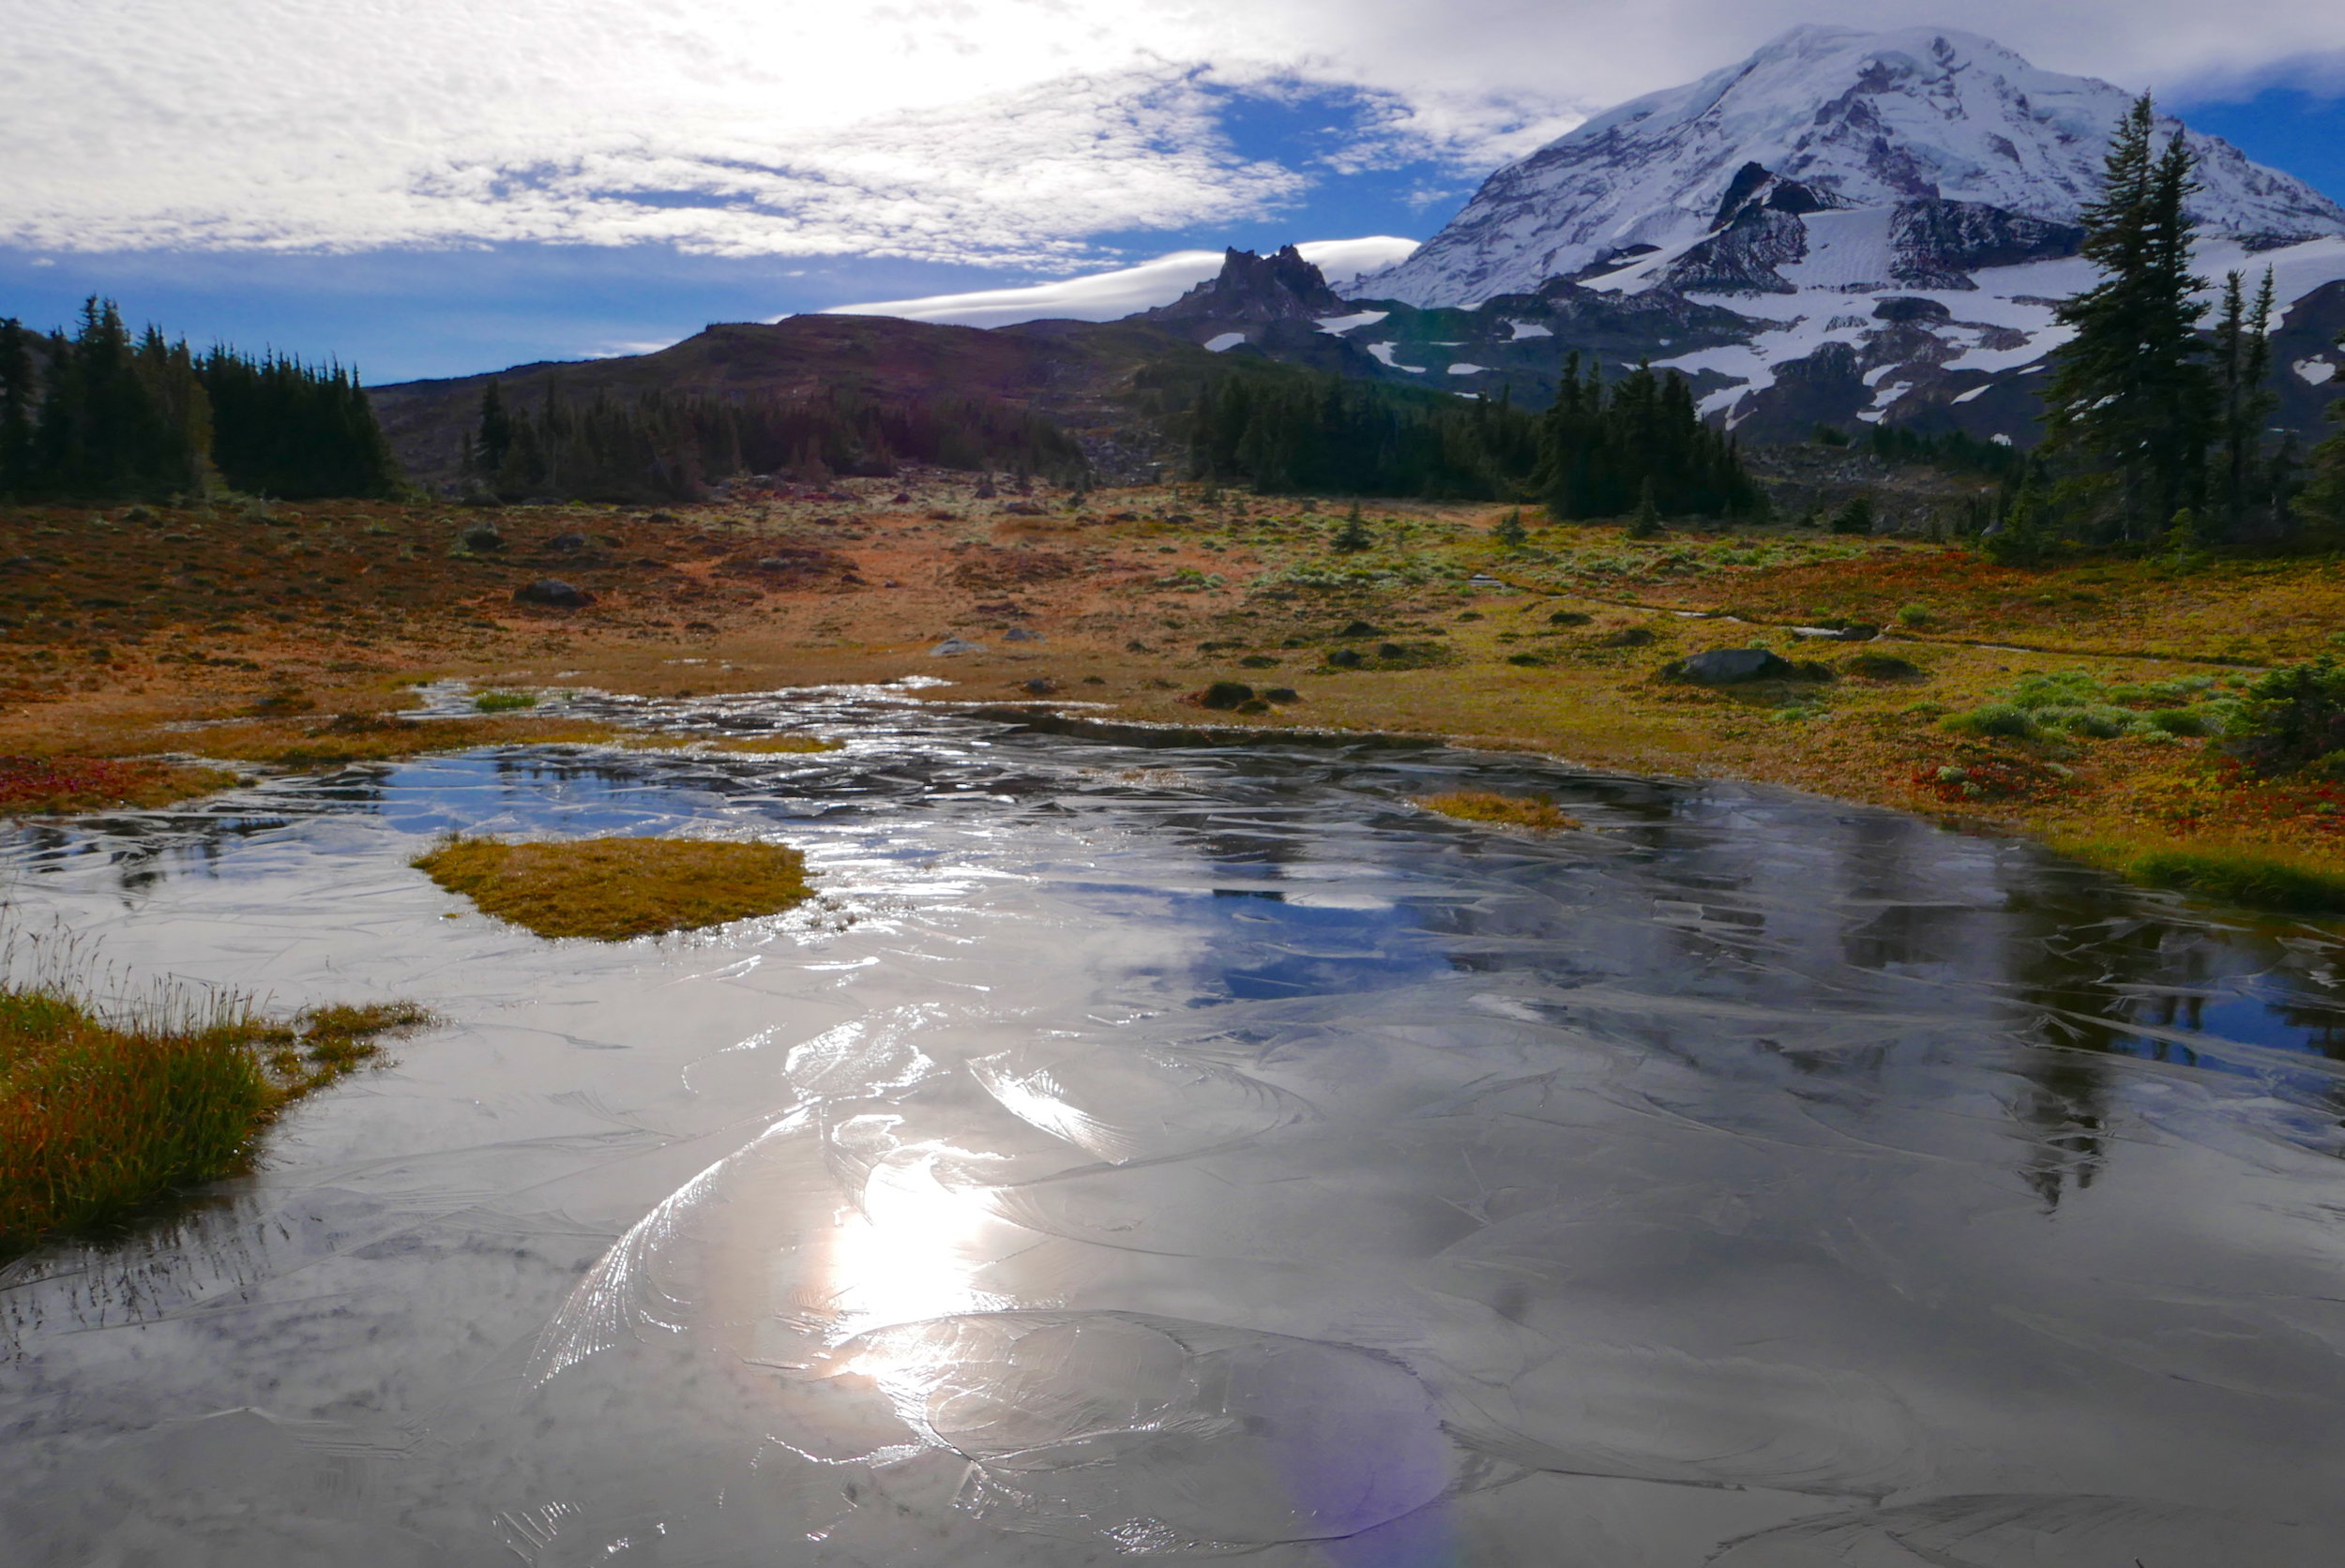
frozen tarn in Spray Park, looking at Echo and Observation Rocks

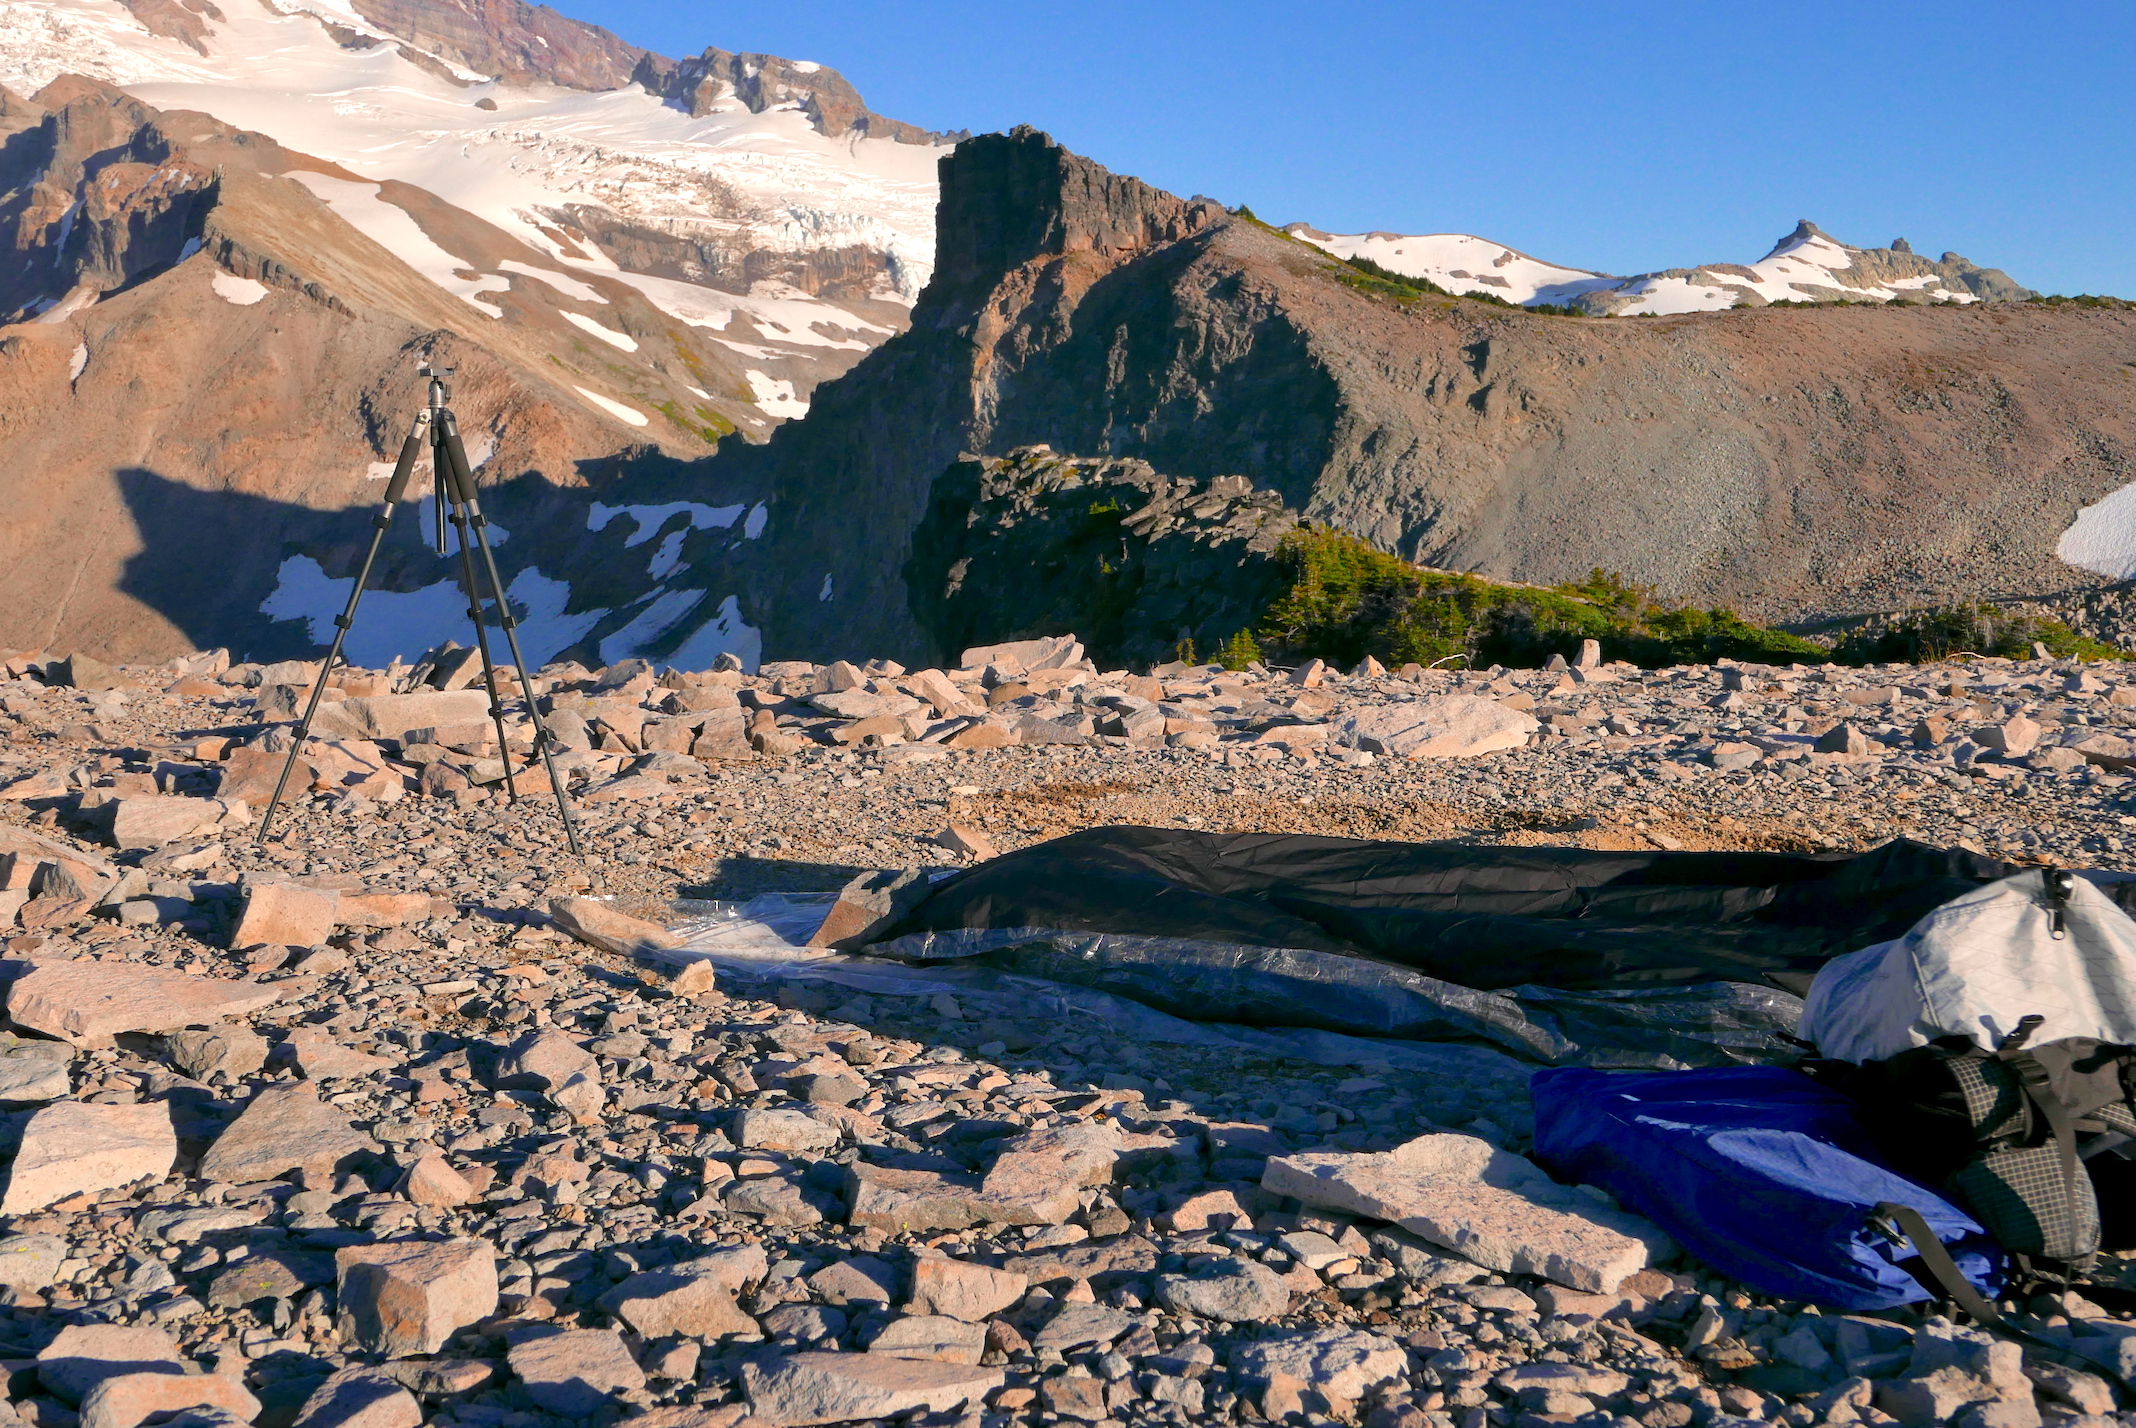
Predawn glow behind the mountain as seen from my bivy spot on The Colonnade, Mt. Rainier

Pugetopolis behind me
A few years ago I crafted a trip around Mt. Rainier which would provide (in my opinion) the most intimate connection with the park, using the encircling Wonderland trail as the main avenue but departing in appropriate places to forge over largely unvisited areas like the Elysian Fields and probing up the myriad cleavers and ridge lines for in-your-face views. One such prominence, The Colonnade, is a place where an overnight bivy was in order to soak in the west facing flank of the mountain in sunset alpenglow. This ridge is accessed about 1.5 miles out of Golden Lakes heading CCW. As is typical for such "off trail" travel, there is an unmaintained trail that pops in and out of view on the way up the ridge, sometimes faint and sometimes obvious. My destination was a flat area on a high point affording a commanding view of the mountain and 360 degree views with the Puget Sound metropolitan city lights aglow behind me. Remnants of some structure were evident there, with rusted cables and old bolts, and further research uncovered the fact that an old fire lookout occupied the site, built in 1930 but quickly abandoned and dismantled for another spot. A discrepancy exists in that the lookout was listed as occupying a spot at 7,176 feet, yet my map and GPS indicated I was at 6,700 foot elevation. Continuing beyond my bivy spot would require much more scrambling and rugged terrain, but I did scurry out on an adjoining fin of rock, at one point just a few feet wide, to experience a more lofty environment. Oddly enough there was a bench mark on this fin from the National Center for Earthquake Research. See complete photo set here.

The Colonnade, Mt. Rainier National Park

Overview of the Grand Tour, Mt. Rainier
With perfect weather I was able to bike the West Side Road to its end (9 miles), then hike the remaining 9 miles or so to my spot on the ridge, arriving at 6 PM with plenty of time to set up my bivy and prepare for the coming pinkathon on the rock and ice before me. I set up my GoPro to time lapse the sunset, snapping photos with abandon and climbing out on the fin. When the color faded from the mountain, I crawled into my bivy to await darkness for some night photography. However, the rising, nearly full moon tracked most of the night from behind the mountain over my right shoulder, finally setting behind me around 5 AM. Bright enough to cast deep shadows and see details, I sometimes had to turn to my left side because it was like trying to sleep with a flashlight shining directly on my face. Such problems are good ones, though, and despite abundant light from the moon and predawn glow, the night was starry nonetheless. The temperature was crisp enough for me to don my shells inside the bivy with my 30 degree quilt, and I stayed cocooned until the morning sun was assaulting me, once clearing the rock obstacle before me.
Most of the high spots on the Tour are designed to be visited by day, retreating to lower elevations for slumber, but this perch on The Colonnade demands an overnight. Another such spot comes to mind, that being Curtis Ridge. I have but one more high point to hit to complete the Tour, and if weather cooperates that may come next week. But if not, The Colonnade will be fresh in my memory as one of the most spectacular spots to spend a night on the mountain.

The View, from the Colonnade
I say Wonderland Trail but this equipment list could apply to any multiday hike in late summer. As I prepare to do my annual Wonderland hike, I have prepacked some equipment and have alternatives, depending on when I go out and possible weather conditions. When I say "fastpacking" I mean probably a 3 day hike of this 93 mile trail, or 4 at most. With the permit chaos this year, I will probably repeat last year's itinerary; start at Longmire, with day 1 ending at Mowich Lake (35 miles, 9500'), utilizing the free walk in camping available there. Day 2 would take me 25 miles with 6000' elevation to stop at White River campground. Lots of places to spread out for an evening, even paying for a site if need be. Day 3 would finish up (33 miles, 6100' elev) the trip back to Longmire. The advantage of this itinerary is no need for permits. Plus, because these days will be long, I have the ability to stop anywhere appropriate to "rest." Resting is not camping, meaning no tent etc, it means simply lying down for a few hours of shuteye. With this in mind, my equipment list is apropos.
EQUIPMENT for RESTING: I won't nail this down until I know the dates, which will be spur of the moment. If the weather is iffy enough to warrant more than this, I of course will go for a walk up permit. Bur for now I will either use my Borah Gear Cuben bivy, or my Borah Gear custom eVent bivy. The Cuben bivy is 4.5 ozs, but this year I had John make me a custom bivy out of breathable cuben, with a side zip and bug net weighing 9.1 ozs. Either can be paired with my ZPacks Pocket Tarp (4 ozs), but the erection of a tarp outside of Mowich Lake crosses into "camping", which will require a permit. Because I will use either my Enlightened Equipment 50 degree or 30 degree Enigma quilt, my pad will be the NeoAir XLite. Minimum weight for these items, 26 ozs. Maximum, 41 ozs.

Zimmerbuilt custom pack: 4" deep
PACK: Real simple, this year I have used a custom pack made by Chris Zimmer (Zimmerbuilt). I designed it so that it took advantage of my entire back's real estate, but is only 4 inches deep. A center full length zip allows easy access to contents; one can only imagine trying to get at an item at the bottom of a 4 inch deep pack. I also had side pockets installed on the minimal hip belt, which is only there to prevent swaying, not for any weight transfer. This makes for an incredibly clean design and exhibits no bounce or sway. Because of the reduced overall volume of this design, I had Chris put in 10 female buckles; 2 top, 2 bottom, 3 on each side. This is why I call this my "Ultimate Pack System", because I can add my custom food bag for longer trips. This add on, also made out of XPac material, is also rectangular shaped with a buckled roll top. It stays secure by buckling into the four top and bottom buckles, and I have the option of further securing with 3 horizontal straps across the back. I have found this add on also handy for keeping water bottles, pringle cans and other items I need ready access to. Most of the time I never need to open the main pack during the day.
PACK ADD ONS: I also designed a custom front pack for this system, which has yet to be built because of Chris's busy schedule. However, I have options in the meantime. I can attach an older custom front pack, also Zimmerbuilt made (2015), or a custom camera pocket, sized for my Panasonic LX100 and a water bottle pocket, which I have used for my InReach and other small items. For my Wonderland trip, I will probably be stripped down with no front pack and no add on food bag.

Zimmerbuilt Ultimate Pack system loaded to the maximum (21 lbs) for 6 day trip
I had this entire pack system loaded down for a 6 day trip with my daughter a few weeks ago, with the front pack and a full food bag. Everything weighed in (minus water) at 21 lbs, with only 9 of that being the gear. I found this to be the weight limit for an acceptable carry, as everything is on my shoulders with this system.
CLOTHING: I'll use one of my long pants and a NTS upper short sleeve. Because I have to be careful with sun exposure, I have been utilizing bike sun sleeves for a few years on blazing days. My noggin will either be covered with my ZPacks Pointy Hat, or an OR cap. For slightly cooler running I use a Beyond Clothing Brokk shirt. On this trip I will not pack a down sweater or vest, as I will either be moving or resting. Therefore I will use my Beyond Clothing ALPHA jacket for the insulation piece (these Beyond Clothing pieces have been drastically discounted as of late). I have used the Alpha jacket during periods of activity over the past 3 years and I can attest to the efficacy of this insulation. As a movement piece it fits perfectly into the ensemble, capped off by my ZPacks Challenger Rain Jacket, which I had made in size XL with pit zips and the extended 40 inch length. With my slim pack design it fits perfectly over my pack(s), essentially acting as a poncho. What's missing? Rain pants/rain kilt/long underwear/change of clothes. Everything I wear dries out by body heat, even if soaked. I will, however, pack 2 more sets of socks, and possibly an extra NTS shirt. Footwear will be by Inov8.
OTHER: med kit, which I will pare down to the minimum. My daughter tends to have more foot issues than I do, so we make sure I have plenty of foot care items. I haven't had a blister for years. Spare headlamp and batteries (lots of night hiking on this trip), spare camera battery, sunscreen, toothbrush, iPhone, InReach, minimal tripod, sunglasses, ZPacks mitts and Challenger Rain Mitts, BeFree .6 liter filter collapsible bottle, and about 5 pounds of food.
I anticipate my total weight, including food and water, to come in at approximately 10 pounds. This weight is unnoticeable when carrying and allows me to cover the distances required for this itinerary, even at age 61. Of course it helps that I have hiked this trail over 30 times. This familiarity, coupled with years of experience, makes me completely comfortable with this setup. Consider that 20 years ago I did this trail in 36 hours with probably 5 pounds of total gear.
I realize that the sparse nature of my kit is not for everybody. I actually prefer sleeping in a bivy (but not in the rain). I am very familiar with my body, nutritional requirements, and mental fitness and I have been able to dial in my equipment, much of it custom made, to my exact needs. I've seen decades of trial and error, and know what works for me. I enjoy both accompanied and solo trips, and my annual Wonderland hike allows me to traipse through this familiar terrain and recharge in the process. I also enjoy the ongoing process of dialing in gear and stressing my body and mind in the doing. Hopefully my next blog entry will be a trip report, where I can refer back to this post and recount my experience, hopefully giving the reader some useful information that he/she can perhaps embrace, or at least try. Cheers!
minimal pack setup in the Enchantments

Mt. Baker Round-The-Mountain route: 58 miles biking, 37 miles walking

Baker RTM bike elevation profile over 58 miles
Some intrepid hikers actually circumnavigated Mt. Baker about a decade ago in 2 stages, finding their own way off trail and battling incessant devils club. This link provides all the details of that trip, luckily archived on the web. In circling this volcano in a more traditional manner, I had to resort to biking and road walking, but it can be done if one has the stomach for it....walking roads is not everyone's cup of tea, nor is biking. On the morning of August 23 I set out from the Lake Ann trail head (Highway 542) on bike and started this two day journey. The first part is somewhat exhilarating, negotiating the curves and switchbacks starting at 4800' elevation, with the rest of the biking in peaceful farm country with a fairly flat middle section; the first 45 miles only has 800 feet of climb, with the last section on Forest Service Road 38 attacking the quads with 2600' of climb over 13 miles, ending at the Ridley Creek trail head. At this point I stashed my bike (after 6 hours of riding) in the woods. See the insert on the main map above for the bike route and click here for the complete photo set.

Day 1 elevation profile for the hike portion (22 miles)
For this trip I wore Pearl Izumi mountain bike shorts, trading the padded bike liner for underwear and the bike top for a hiking shirt, leaving these clothes, helmet and road/phone case in the pannier. I usually hike in long pants and the decision to stick with the shorts would bite me later on. I unfolded my ZPacks staff and headed out on the Ridley Creek trail, with no problems on the crossing as there is an adequate bridge in place. I was delighted that the bugs were few and the temperatures were cool, as this trail is rather steep in some places. After laboring uphill for a time, giving my quads time to adjust to hiking versus biking, the forest gave way to more open meadows and the intersection with the Park Butte trail. I stopped at the shelter and exchanged pleasantries with the WTA crew that were there, expressing my thanks for their good work. I had regained the altitude at the crest of the Park Butte trail from whence I started and would now spend many hours descending to much lower elevations. I arrived at the Mt. Baker NRA trail head with plenty of light to spare (about 6:30 PM), ate a snack and refilled my water from a nearby creek, then set off on my series of road walks. I trotted the downhill on Road 13 to the intersection with Road 12, and by the time I stepped foot on the paved Baker Lake Road (11) it was dark. Now I am completely comfortable with night hiking solo in the back country, but there is a certain creepiness in walking a road late at night when it comes to the human element. I decided that if vehicles came along I would duck into the grass and turn off my light, no reason to let anyone know I was there. I had to do this only twice, reminiscent of my Air Force Survival School days and stealth training. Around midnight I got a text from my wife (InReach) saying not to push it too hard and perhaps I should find a place to sleep. Seemed like a good idea, so after 18 hours of biking and hiking, covering about 80 miles to that point, I stopped at the Boulder Creek CG, right before the intersection with Road 1130, and laid out my bivy and bag on a picnic table to catch a few Zzzz's.

Old growth splendor on the Ridley Creek trail

Mt. Baker from the Park Butte trail

The mossy forest walk on Road 1130
RUDE AWAKENING: I've slept on picnic tables quite a few times over the past 30 years, and was not prepared for what happened. As I turned over in my sleep, I awoke airborne as I had rolled off the table, impacting the ground on my right side. It took me a few minutes to extricate myself from the bivy, and after resetting up sleep arrangements on the ground, I concluded that I had probably bruised some ribs, or damaged the muscle that runs across the right pec. With no choice but to try and get back to sleep, I rebedded on terra firma and awoke at 6 AM. Although sore, nothing seemed to be badly damaged so I gingerly packed up and set off for the remainder of the trip, having to cover the last 15 miles.
3 Advil took the edge off the pain and the morning was cool but not cold, there were no bugs about, and I enjoyed a very lovely walk up Road 1130, bounded by moss covered trees and able to refill my water with small trickling creeks. Soon enough I intersected Road 1144 (closed from the Baker Lake road) and a very short section deposited me back on trail for the rest of the trek. At first I was encouraged by the pleasantness of the Swift Creek trail, strolling through old growth forest, planked walkways and moss lined trail. This quickly vanished at the crossing of Swift Creek, the only place that was actually a "difficult crossing" noted on the map; IOW, no bridge, but there was an old cable system and I could espy the ramp on the other side. I pulled the cable and it worked just fine, but there was nothing attached to it so I had to resort to the old fashioned way of finding my way across, feet wet. From this point on the Swift Creek trail tore me up; it didn't matter if it was a brushy open hillside or forested way, whatever was growing next to the trail had small, probably toxic thorns that actually made the contact areas tingling and numb (lasting until the next day). Obviously at this point I wished I had my long pants, but the show must go on and I endured, seemingly forever, until at last I reached the intersection with the Lake Ann trail. With only 2.4 miles to go at 3 PM, I brushed off the aching ribs, numbing shins and rising heat to enjoy this pleasant stroll to my awaiting truck, climbing to my starting elevation of 4800 feet and completing the loop.

polypore colony

impressive old growth
I cleaned up as best I could and set off to retrieve my bike at 4:15 PM. Going in and out of FS 38 took nearly 2 hours, as at some points I couldn't do more than 10 MPH on this 13 mile long road. I finally got home just before 10 PM; after a much needed shower my wife attended to my various physical ailments, fed me and handed me 3 more Advil, watching me grimace as I tried to lie down. So ends the Mt. Baker Round-The-Mountain, probably the only time this particular iteration will ever be done, 'cause I'm sure not to repeat it and I seriously doubt anyone else would find this appealing. But if you do, might I suggest you sleep on the ground.
I've been recording classic bike descents in the state, and the initial portion of Mt. Baker Highway 542 ranks among the best. I brought at least one camera to capture some of the biking. This video entails the first 7 miles of the ride with 2,000 feet of winding descent.
As part of a Mt. Baker Round-The-Mountain trip, my first segment was 58 miles of biking, starting at the Lake Ann trail head. I proceeded west on Highway 542, then south, then on to the Mosquito Lake Road, and finally finishing up the bike segment on FS 38. This video covers the initial bike segment, 7 miles and 2,000 feet of exhilarating descent, another classic bike route in Washington State.
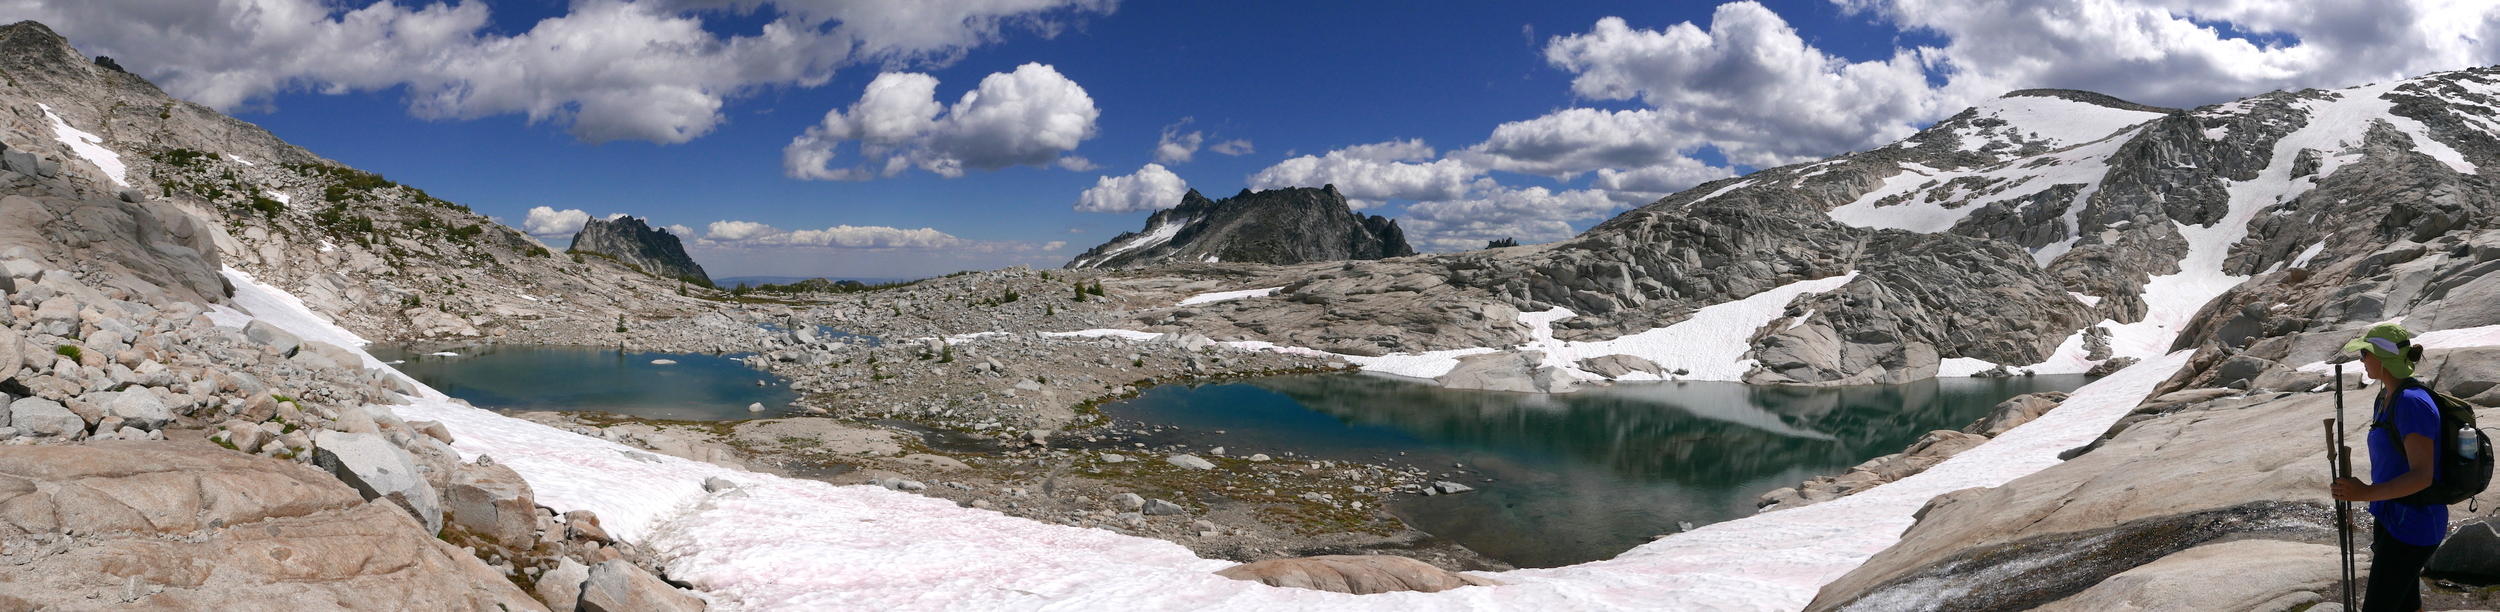
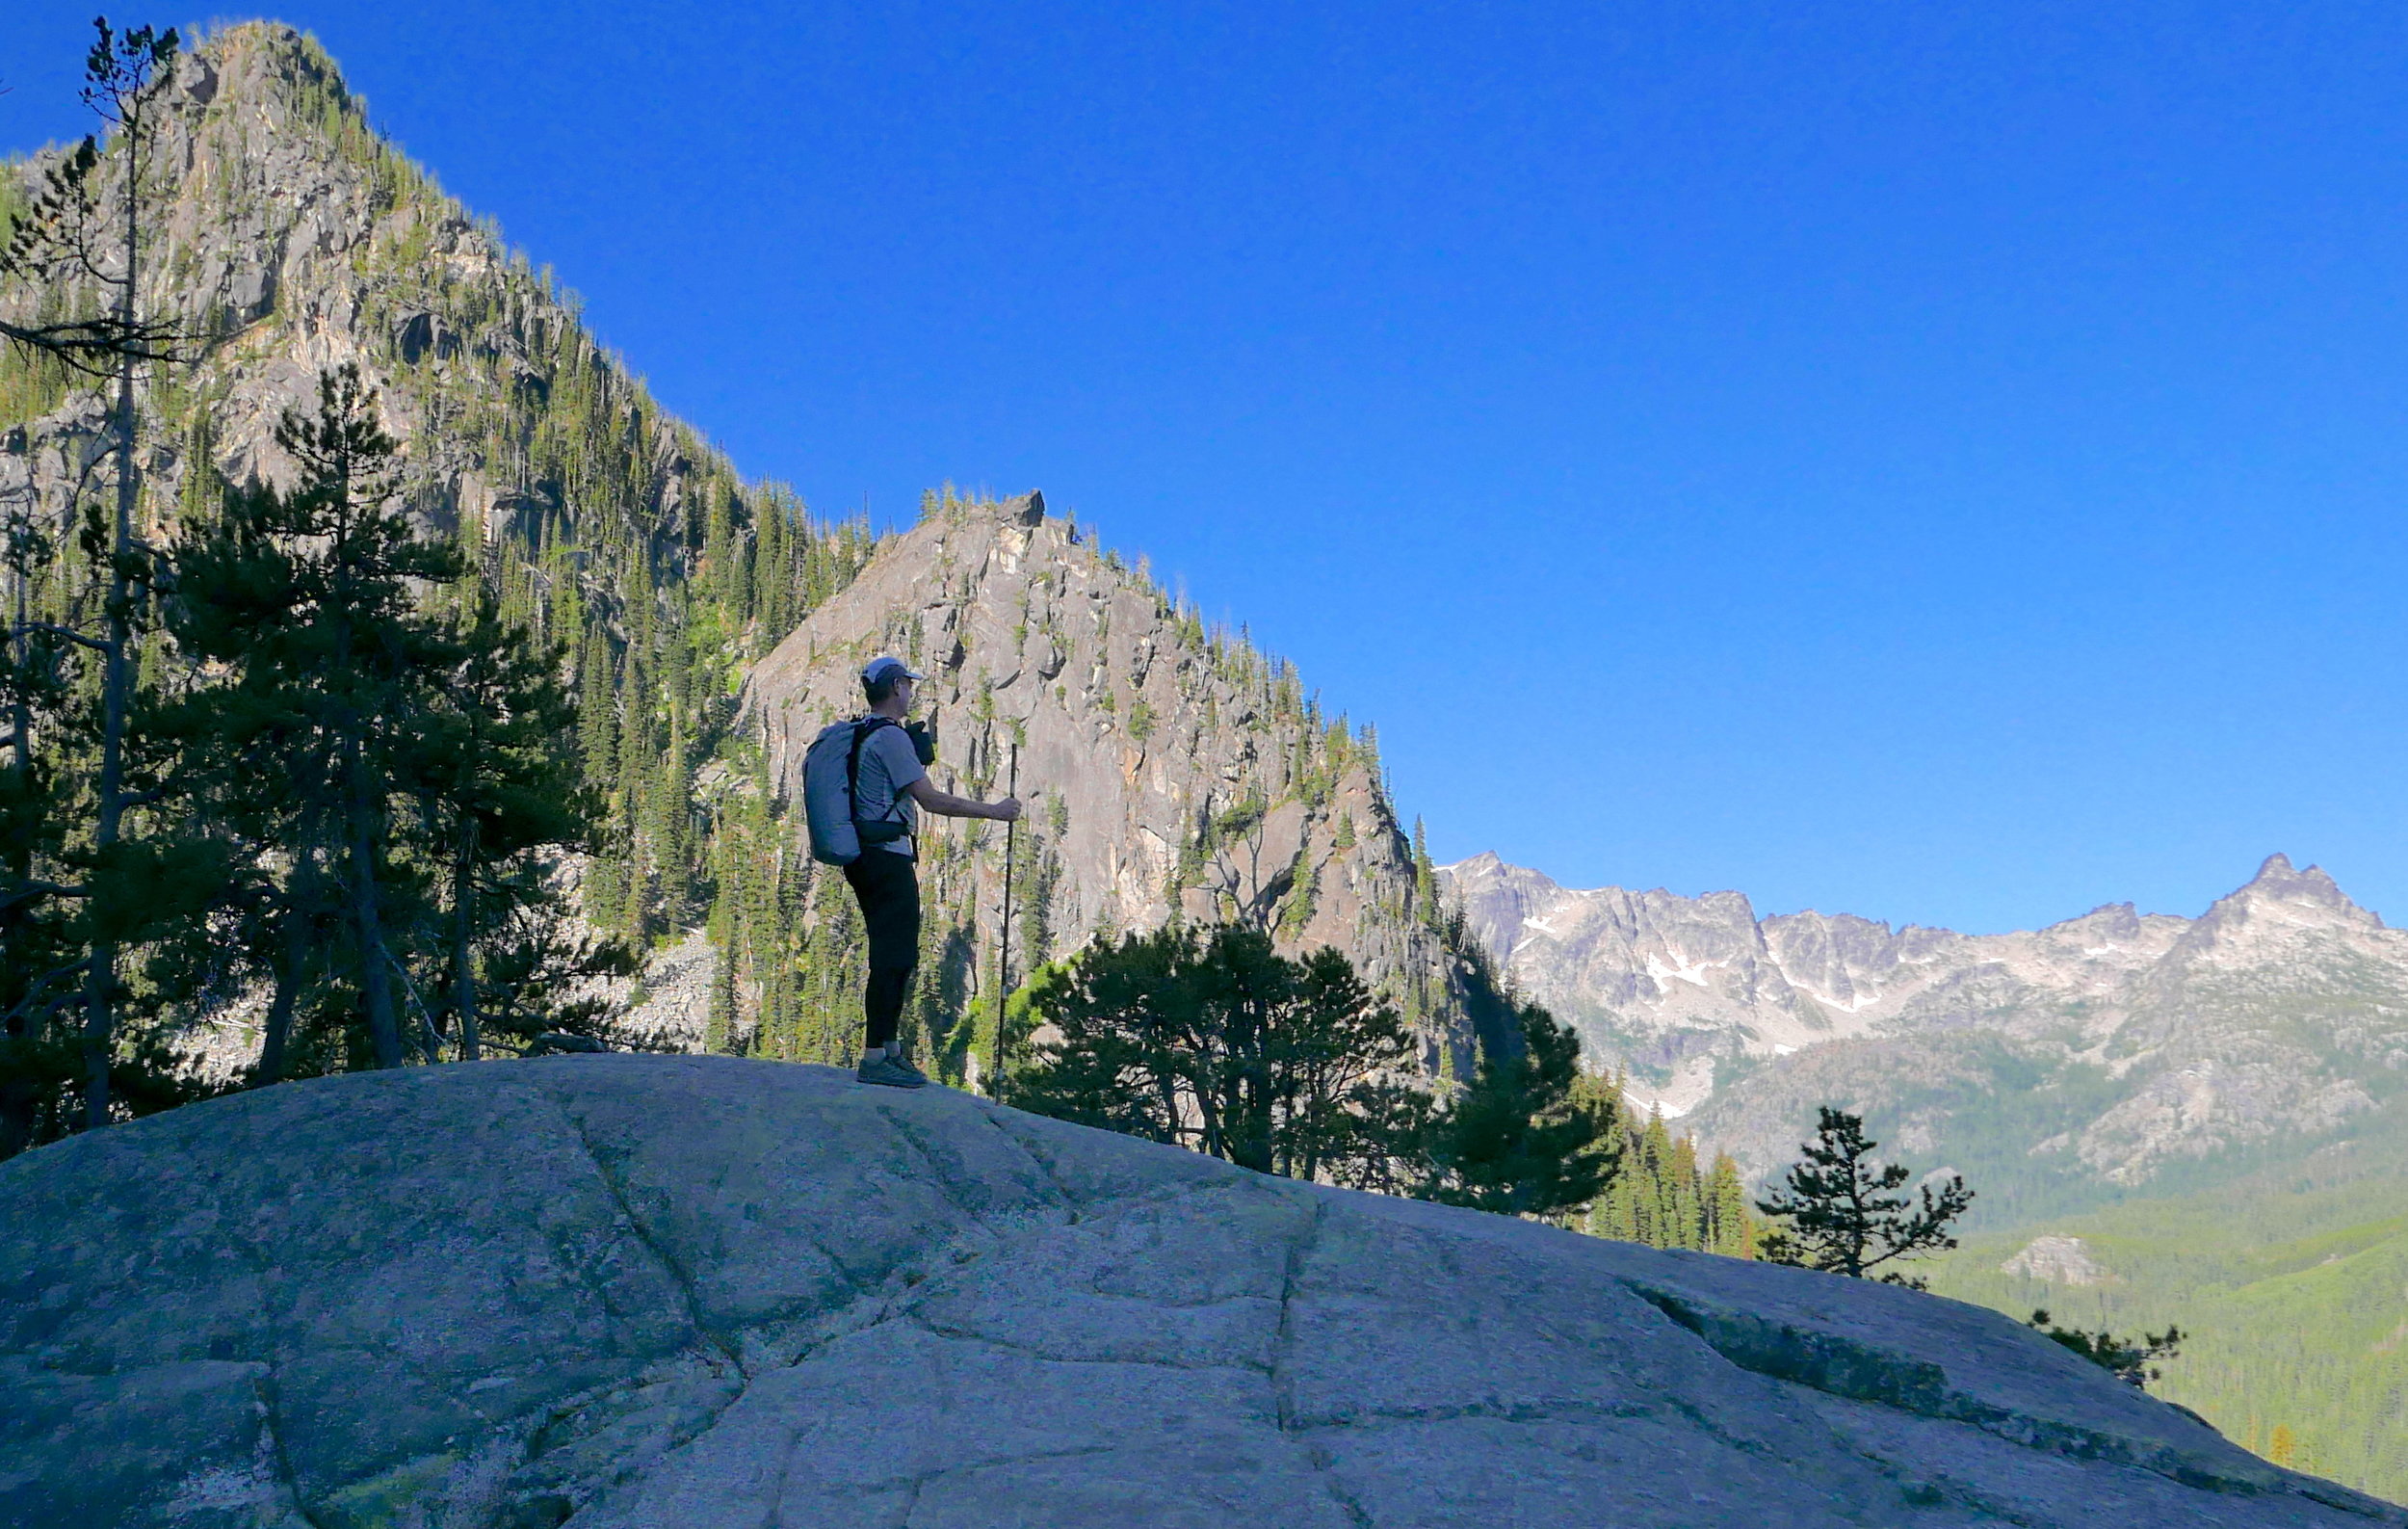
Upper basin in the Enchantments after transiting Aasgard pass
This description of the Enchantments (Alpine Lakes Wilderness, WA) from the Washington Trails Association (WTA) site provides an excellent overview:
In the Enchantments, nature has carved one of the magnificent places of this world--an alpine paradise of granite worn smooth by glaciers, larches manicured by wind and cold, and crystal blue lakes strung together by a creek that tumbles and thunders between them. Seemingly everywhere, herds of mountain goats calmly wander by. Superlatives simply don’t suffice, and you quickly find yourself resorting to otherworldly comparisons, just like the early visitors who bestowed place names like Aasgard, Sprite and Leprechaun on the fairy tale surroundings.
There are three ways to experience the Enchantments, none easy. The absolute minimum price of admission here is a hike of not less than seven miles gaining at least 4,400 feet in elevation in order to make it to even just one of the lakes in the Upper Enchantments. If you're lucky enough to get an overnight permit, you can backpack at your leisure via the Snow Lakes or Stuart Lake trailheads. If you’re a very strong hiker, you can make it in and out via either trailhead in a single day, although seeing all of the lakes this way is so grueling it borders on the impossible. With two cars (or a car and some bikes), you can hike point-to-point from one trailhead to the other and transit between the two. The thru-hike is typically done from the Stuart Lake trailhead, because it reduces the total elevation gain by 2,600 feet relative to going the opposite direction (although it still takes in the punishing climb up Aasgard Pass, which rises 1,900 feet in less than a mile). Pick your poison; enjoy the rewards.

Our one day transit of the Enchantments on August 12, 2016
My daughter and I did this transit on August 12, 2016. The description above might be a bit discouraging ("is so grueling it borders on the impossible") but we found this hike to be extremely enjoyable as a one day, with pain only nagging us at the end towards the Snow Lakes Trailhead. We availed ourselves of the Leavenworth Shuttle, allowing us to leave our vehicle at the Snow Lakes trailhead and begin our hike at the Lake Stuart trailhead, feet on the trail at 6:20 AM, well worth the price of admission. We were not in top shape for this but, knowing the score at the get go, our plan was to linger in the upper basins and endure the interminable downhill slog after Nada Lake. We snacked, soaked our feet in the cold waters, and at one point stood for twenty minutes as a mountain goat and her kid munched on grasses right up to our feet; we may as well have been trees or rocks. So awesome were the views that I snapped 450 pix along the way. This area certainly lives up to its reputation, and we found the crowds thin in the upper areas, possibly because the strenuous nature of this hike weeds out the casual backpacker. By upper areas I mean from Aasgard pass to Lake Viviane. Last year we had a core permit but the weather was daunting, drastically thinning out the usual summer throngs with reports of snow and 60 MPH winds. We certainly enjoyed our stay there but after exploring the area in rain and wind wearing 3 layers, this transit in incredible weather was indeed a visual and experiential feast, well worth the payment in grinding downhill and sore legs afterwards.

unconcerned kid in the Enchantments

The Bike Challenge covers all the significant climbs in Mt. Rainier National Park

scenery along the Bike Challenge ride
I like to make stuff up. I like to make stuff up that's hard. Tomorrow I ride the STP (Seattle To Portland, 205 miles). That's easy; lots of support, gentle hills for the most part, lots of stops to chow down, to get my mocha on, to chill for a few minutes. This is of course over two days. I've done STP twice in one day and that's a more serious undertaking. But these past 4 years it's been an opportunity to hang with my old buddy Craig and enjoy the scenery.
Enter the Mt. Rainier Bike Challenge. I've been doing a bit more biking this year as a result of dealing with a persistent sore knee, and biking doesn't bother it. I like the climbs and descents available within the park. I've finished filming all of these; to view check out the Biking Rainier pull down. RAMROD covers most of this route but has significant mileage outside the park boundaries. To make it harder, I've established a few rules:
1. Bike must be able to negotiate the West Side Road out and back, at 24 miles and +/- 3200 feet of elevation. This means the entire West Side Road, starting at the intersection with the main road to Longmire. No 17 pound road bikes with skinny tires, thank you very much.
2. Self supported: gotta carry everything, including overnight gear. Of course, refilling water along the way is permitted. When I attempted this route two days ago I had food for two days, a bivy bag, sleeping bag, clothes to change into, repair kit, foul weather gear, etc.
3. Maximum badassery extra credit: Do this entire route to Sunrise, spend the night, and ride back to your vehicle, adding another 70 miles and 10,000 feet of climb.

West Side Road scenery
I'm an endurance athlete by genetic makeup, not very fast (although I actually won my age division in a couple of ultras in my 40's) but able to go a long time, embracing the suffering in the process. What with remodeling and unenticing weather of late, Wednesday's forecast (July 13, 2016) was good. Despite being just days from STP, I thought I'd give it a go as Craig could meet me at White River Campground so I could get a ride back to my vehicle after a well deserved break. When I started out I had already decided to drive to Longmire after the West Side Road as it was a much better place to leave my vehicle over night. That scratched 6 miles and 600 feet of elevation right there, making the possible total 91 miles and 12, 400 feet of climb. I started biking early (5:15 AM) in the fog and found that the park had fixed the WSR washout area and cleared the road of downed trees, which we encountered in the spring. However, the going was slow on this dirt road, with numerous muddy patches, rocky sections and general slow going. It was a very pleasant ride but took me nearly 5 hours for the out and back. I started the bike from Longmire at 11 AM, immediately dealing with the road renovations on the way to Paradise, swollen with people and vehicles to the point of bursting...welcome to summer. Once I left this route and turned left onto the Stevens Canyon Road, traffic eased significantly but was still enough to warrant caution. In my self assessment up to that point (having climbed 6,000 feet), I was not sure that I could double this within the day and leave enough in the tank for the upcoming STP just a few days later. I was able to rest on the descent to the Stevens Canyon entrance, interrupted by the 600 foot climb to Backbone Ridge, but sometime into the climb on SR 123 to Cayuse Pass I could tell my day would have to be shortened. I knew I wouldn't have the legs or the time to climb to Sunrise so I also decided to skip the 600 foot climb to Chinook Pass and just get to the campground. This still required another 800 feet of climb but it sure felt good to change, clean up a bit, eat and enjoy the coffee. I could have left more on the road and pushed into "that zone" but I didn't want to jeopardize my weekend ride. Besides, I was climbing so slowly at the end of the day (I was passed easily by two other bikers) trying not to hurt myself that it was obvious I needed to stop. I like my big ideas and challenges, but I also need to be reminded of my age and lack of training to put things in perspective. Someday I'll do this challenge when the stars are aligned a bit better.
Map My Ride had my totals for the day at 80 miles and 11,400 feet of climb. Sounds a little ambitious according my my calculations but I do know it was a rather hard day. I guess this weekend will mark my transition from biking to hiking, as my daughter and I have big, hard plans for the end of the summer. Cheers, and here's to doing hard stuff!
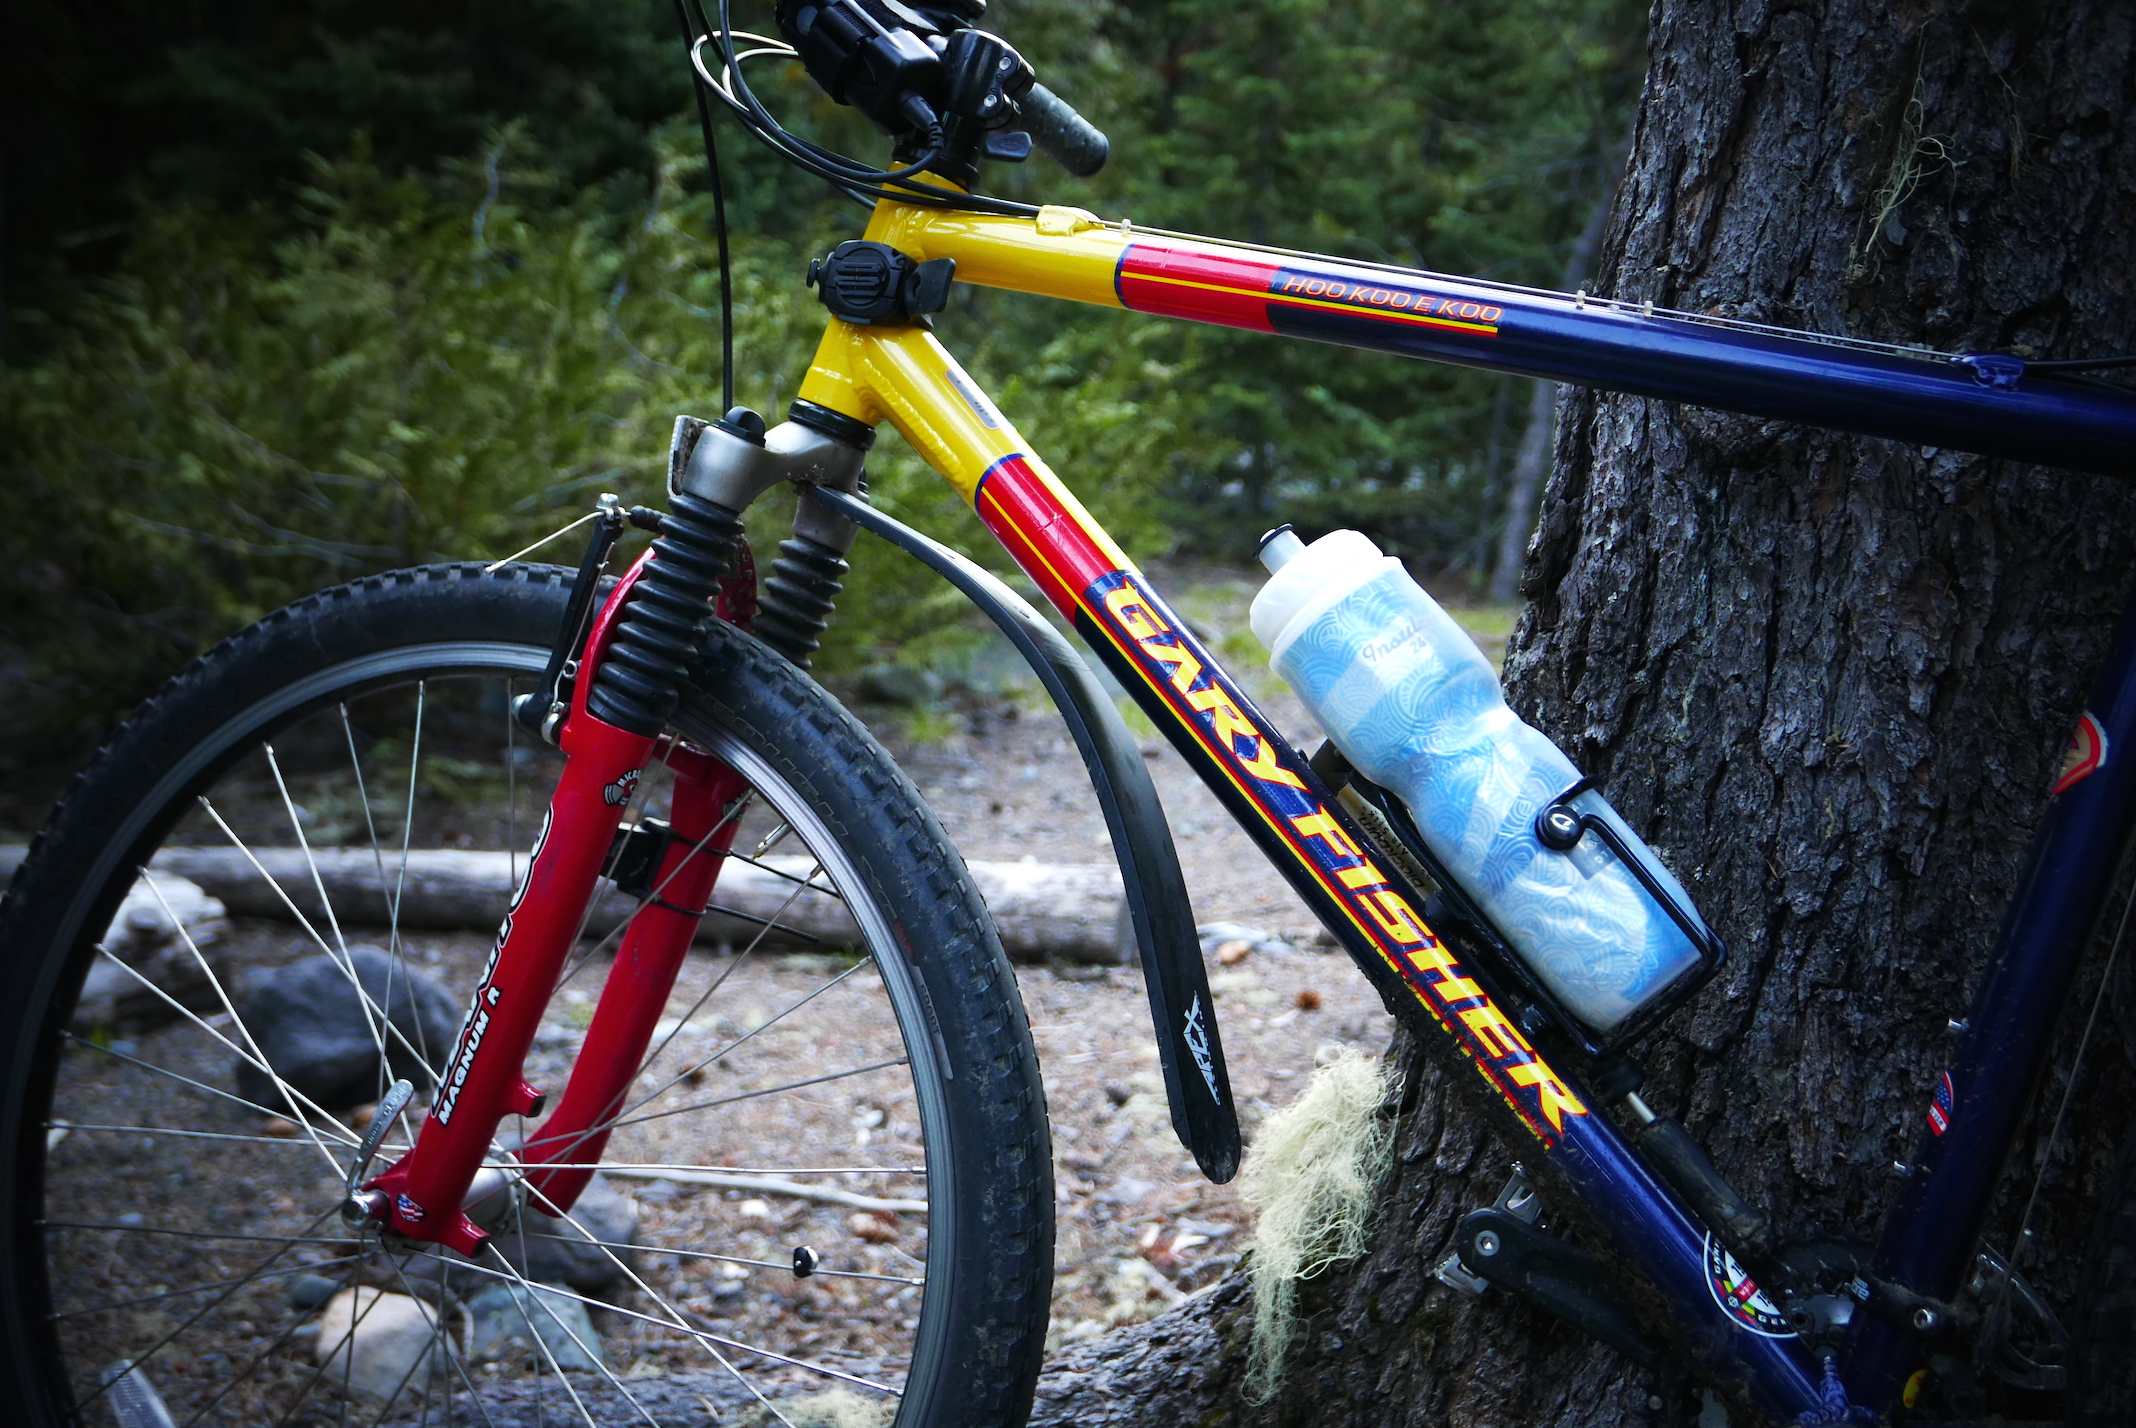
my vintage steed: handled rocks, mud, gravel, chewed up roads and macadam on the Bike Challenge
There was a time when I sought out discounts from cottage manufacturers and outright sponsorships. I had some experience in the outdoors so why not capitalize on this? I essentially thought it was cool to get gear at a discount or outright free. Perhaps I felt validated in some way that a gear manufacturer would offer me items for use. But at what cost? I had no obligation to provide positive reviews in any way, but let's be real. If I am getting free gear then there is an inherent pressure to provide positive feedback; otherwise, the free gear pipeline would probably get cut off. What company would continually sponsor a representative if that representative pointed out flaws in this same gear? Reality check: if one is getting free gear, a review of that gear is inherently biased, despite the good intentions of the user.
A recent brouhaha on a certain forum concerning a review of a certain item highlighted this conundrum. The reviewer in question had no problem advertising their affiliations with companies, to the extent that their forum avatar was a conglomeration of company logos listed as sponsors. 10 years ago I thought this was cool, but now I'm looking at this from a different angle. I no longer want, nor would accept, sponsorship from any outdoor gear manufacturer (besides, why would anyone seek to sponsor an aged average dude who hikes a little?). I carefully research gear that might fit my needs, then purchase an item based on this research, then use it. If it lives up to my expectations, falls short, or exceeds them, then I may choose to write about it so that another person doing internet research can gather more information before they decide on a purchase. In my research I am seeking user experience, not "unboxing videos", from people who paid for this item with their hard earned cash and have actually used the item for a period of time, enough to validate their opinions. Even then, people have a propensity to justify their purchase. Who wants to admit that they spent $X on something that failed real world use? Human nature pressures a reviewer to justify their purchase. It takes a well adjusted, down to earth individual to admit that they spent money on something that failed them.
There is an exception: people who do extraordinary things, who are at the top of their class, who through their very actions stand out in a crowd. These people may accept sponsorships from companies because it allows them to continue pushing boundaries and generally standing out in their fields of endeavors. They draw attention because of their actions, and for this companies will sponsor them because just wearing their clothing or using their gear will benefit the company from the exposure. Generally speaking, this outstanding athlete will not usually write a review of this gear; it's enough that they are using it. I would consider this a mutually beneficial arrangement: the athlete can continue their endeavors with less worry of expenditure, and the company gets exposure from the public endeavors of the athlete.

The "Pack Pose"....back to camera, cool overlook or background
Maybe not so in the less lofty blogging world. I recently visited a website of a representative of a certain company and checked their gear reviews, many of which were of their sponsor(s). The photos incorporated in these reviews were transparent: Here I am at this cool overlook, take a picture of me so this pack will be prominent in the photo, preferably with my back turned to the camera as I contemplate the wonder before me. And again. And again. Plus this blogger did not make the association with the sponsor evident in each post, unless the reader clicked for expanded information. The FCC has laid out guidelines that are available to anyone searching online, but here is one example:
A college student who has earned a reputation as a video game expert maintains a personal weblog or “blog” where he posts entries about his gaming experiences. Readers of his blog frequently seek his opinions about video game hardware and software. As it has done in the past, the manufacturer of a newly released video game system sends the student a free copy of the system and asks him to write about it on his blog. He tests the new gaming system and writes a favorable review. Because his review is disseminated via a form of consumer-generated media in which his relationship to the advertiser is not inherently obvious, readers are unlikely to know that he has received the video game system free of charge in exchange for his review of the product, and given the value of the video game system, this fact likely would materially affect the credibility they attach to his endorsement. Accordingly, the blogger should clearly and conspicuously disclose that he received the gaming system free of charge.
So, if a blogger is given an item free or charge, or even discounted, the blogger is required by the FCC to make this relationship known in each instance, clearly and conspicuously. Therein lies the aforementioned brouhaha about a gear review....this relationship was not made evident in the review, despite the company being listed as one of their sponsors in a side bar. Perhaps the blogger paid full price? Perhaps a discount? How can the reader know, if the blogger does not offer up the information?
When I received free or discounted gear from a company, I felt an inherent pressure to somehow showcase this gear. Luckily for me, in retrospect I can say that I didn't skew my review(s) toward the positive. The gear worked, and worked well. In fact, to this day I still use some of this gear that is towards 10 years old. In one post I actually said "I don't use gear that sucks", after my disclaimer of course. But I have to say, the relief of just buying gear at market prices, or at advertised discounts available to everyone, is palpable. I no longer think about pix or video when I'm on a hike, bike or ski, that might showcase the free gear I got. Now, if I like it I write about it, but only because I want to help on line researchers in their purchasing decision making. And I really like to promote US based manufacturers of quality outdoor gear. I'll spend more to buy Beyond Clothing, because it's stitched in the US and it's damn good gear. I'm a fan of Zimmerbuilt, ZPacks, Enlightened Equipment and Borah Gear. Mountain Laurel Designs has an excellent reputation. There's some great stuff out there and people should know about it that take the time to research. If I post about gear now, I have no sponsorship bias. I gladly pay full price (or advertised discounts) for quality gear, especially if it's made in the US. And if it works for my usage, then I'll write about it with the intent of helping people in their gear decisions. When I research, I consider if the reviewer is sponsored by a company and decide for myself if the review is biased because of this association. And when I come across the "Pack Pose" I can't help but chuckle.

sunset on Santa Cruz Island as we head back to camp
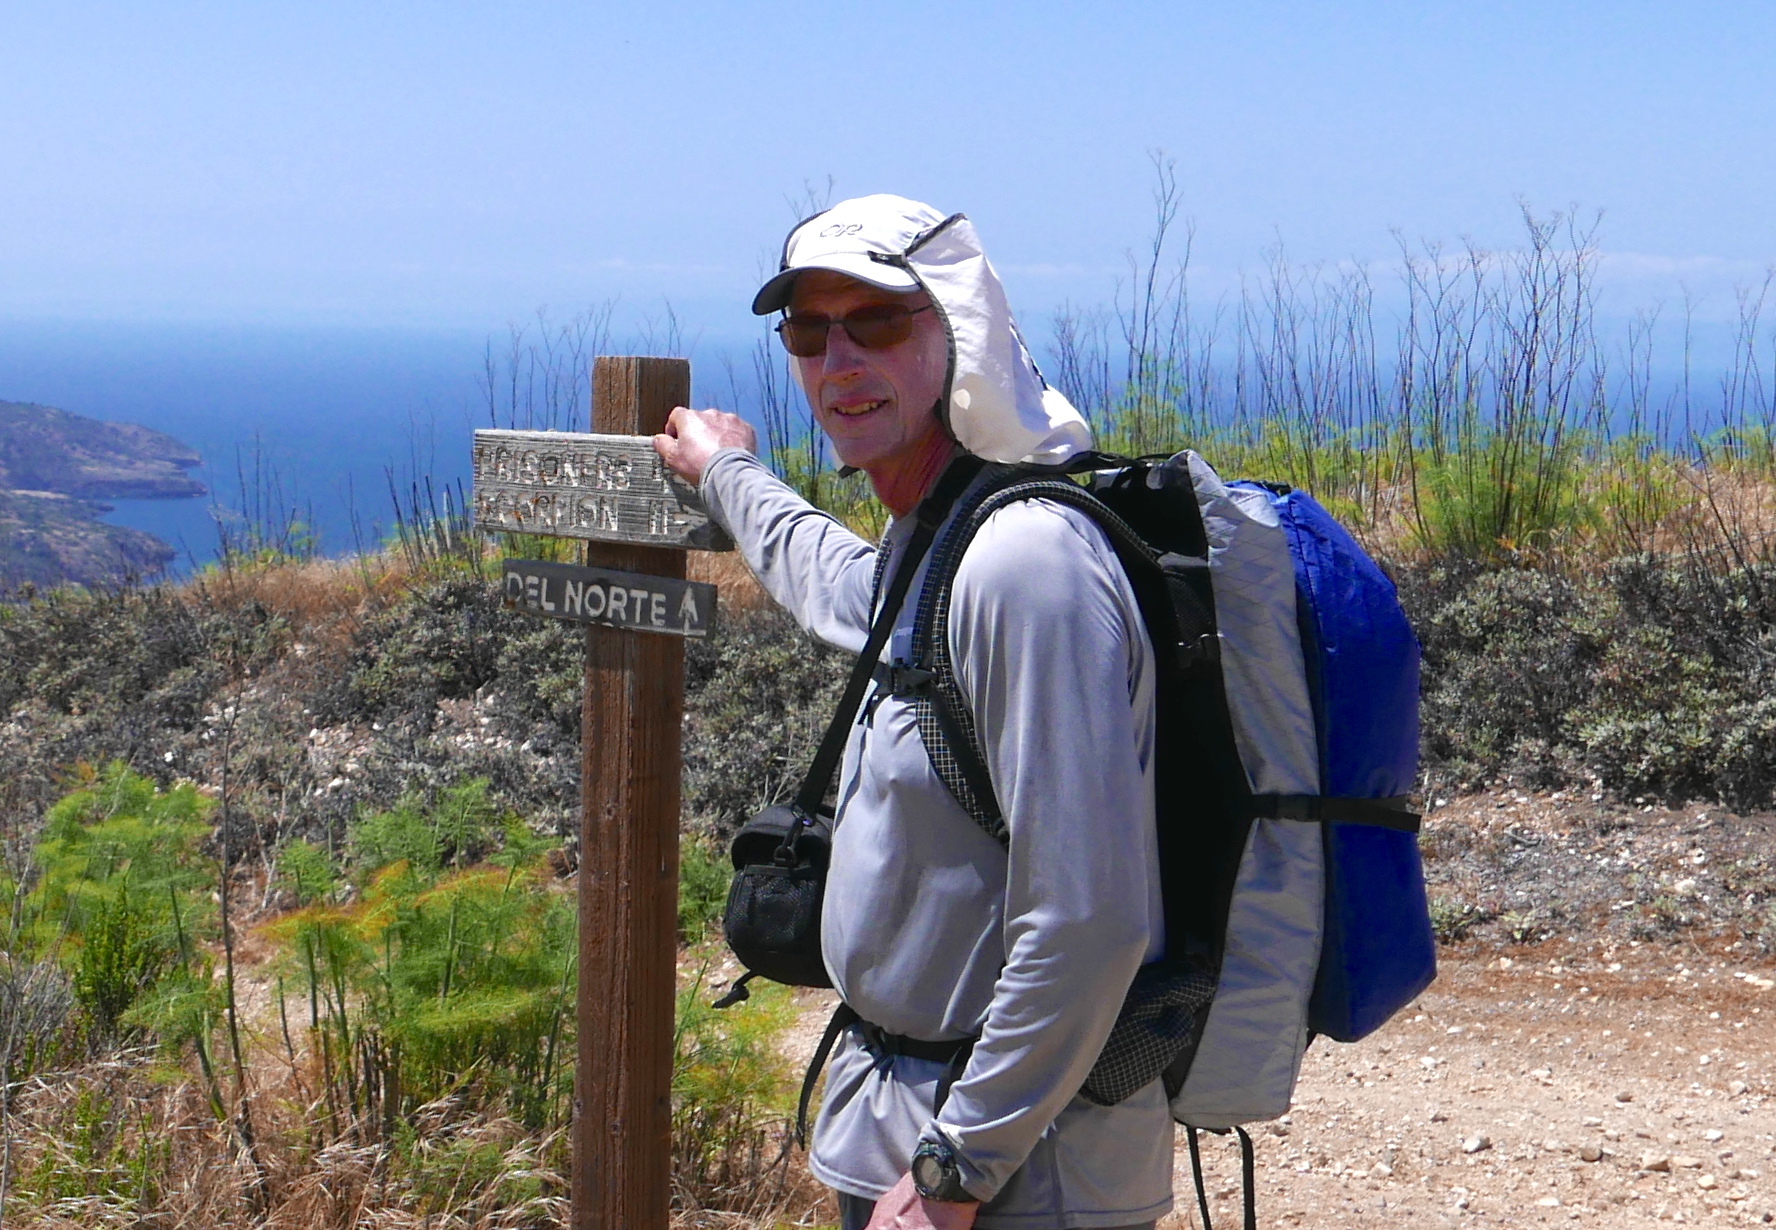
My daughter and I took advantage of a few free days from her work this summer to head to the Channel Islands National Park, Santa Cruz Island. This can't be a spur of the moment trip due to the logistics. There is one backcountry camp on the island and one has to make the reservation in advance, especially as there are only 3 campsites. We also had to reserve and book space on the boat transportation (Island Packers) for the round trip. Another logistical consideration is the lack of fresh water on the island, so we had to pack all our water for two days. Waiting for our boat we made note that all the back packers for the different islands that morning were well laden, and we were glad for our small packs once again. We hand carried two one gallon jugs of water for the hike into Del Norte camp and stashed them there as the 4 mile hike in was short enough so as not to matter we were cradling water jugs like a newborn. Full Photo Set here.
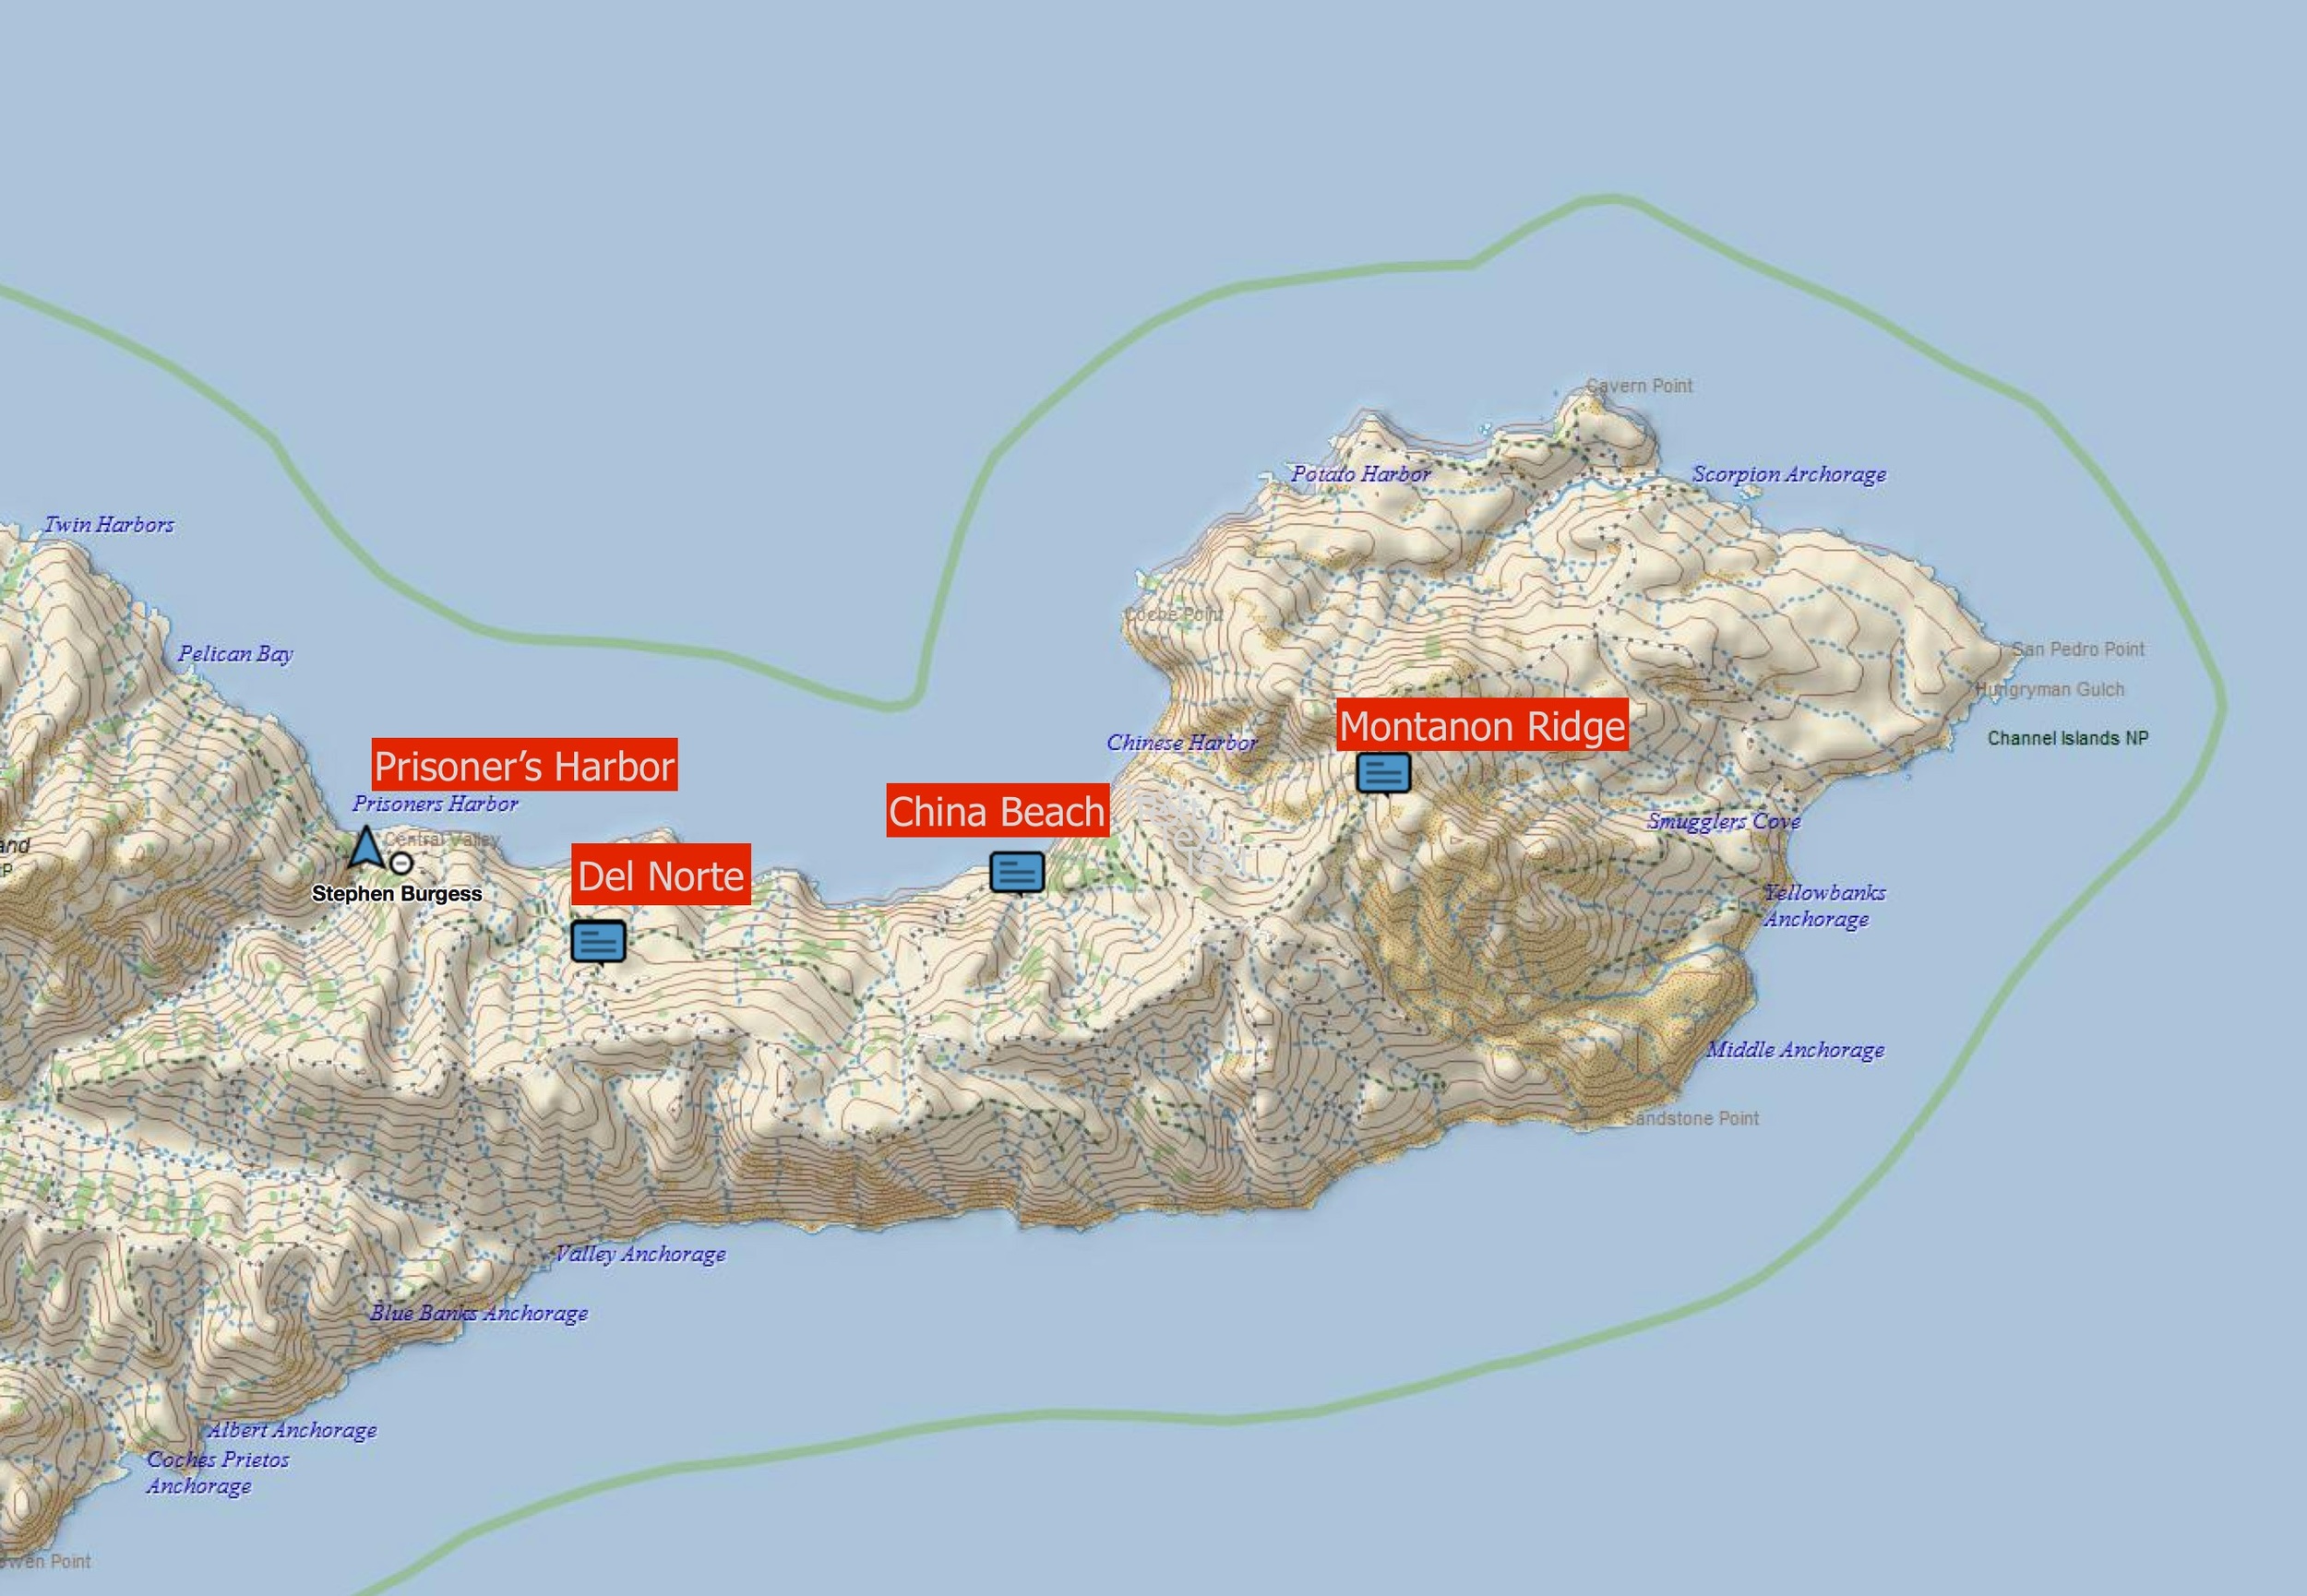
trip points, arrive/depart Prisoner's Harbor, Del Norte campground, China Beach and Montanon Ridge
This trip is perfect for a two day excursion. Once we set up our camp in the only shaded site on the entire island (at least it seemed that way), we stashed our excess food in the locker provided, filled up our 1.5 liter bottles, and set off for Montanon Ridge. Distances were a little free flowing, the provided map didn't seem to jive with reality, but we estimated the total for the day from Prisoner's Bay drop off, to Del Norte, and the round trip back to camp from Montanon Ridge to be approximately 17 miles, with surprisingly fair elevation gain and loss what with the rolling hills and the ridge being at 1700 feet elevation. This trip provided us with a completely different ecosystem from the Pacific Northwest, with stiff breezes all day, open views to incredibly blue water, and brown grassy fields dotted with various flowering bushes and the occasional cactus. Although the temperatures were mild (Low 54/High 70F), the blazing sun on the uphills made it feel much hotter but could be followed minutes later with enough chill from the breeze to don another layer. For this first day we were already stunned by the amazing amount of sea life we saw on the boat (grey whales, humpbacks, dolphins, sea lions, pelicans and myriad birds), only to be followed by sublime far reaching views of the rolling hills and ocean, topped by 360 degree views on Montanon Ridge. The timing was perfect for a sunset on the way back with the near full moon rising behind us. This itinerary had us settling in our campsite at 10 PM, a perfect day of length and terrain, considering neither of us had our hiking legs yet.

Montanon Ridge pano
On day 2 we figured we could head to China Beach, return to camp, pack up and be at Prisoner's Bay for our scheduled 4:30 PM pickup without being under undue time duress. The day went without a hitch and we had enough water left to clean up a bit before heading to the rendezvous point. We were able to witness the uncommon phenomenon of warmer El Nino currents depositing Baja red crabs by the thousands over southern California beaches, a pink line on the sand akin to painting. On this last day we covered about 15 miles, so the entire trip was essentially perfect for pace, views, and terrain covered for unaccustomed legs.
Zimmerbuilt dual pack custom system
GEAR: We used the ZPacks Duplex for shelter, 12 oz pads, and Zimmerbuilt packs. Mine is a custom system I had Chris make for me, with the main pack being wider and taller but only 4 inches deep. I had him install a full length zipper for access, with 3 attach points for removable straps. The second part of the system is a custom food bag, also 4 inches deep but shaped to piggyback on my main pack, with attach points top and bottom. This flexibility of configuration is proving successful but I've only used this pack on two trips so far. I'll wait until the end of the season for a full report on its efficacy. For sleep my daughter used a 1 lb. Feathered Friends Vireo and I availed myself yet again of my sub 10 oz Enlightened Equipment quilt, perfect for these mild temperatures. We never felt burdened, even carrying the extra water; our packs went unnoticed, my gauge of efficient packing.

waning light on Montanon Ridge, Santa Cruz Island