Fastpacker's Notebook: Packing Cameras
This is the first in a series I will produce on my quest to find the best techniques, equipment, people or anything else that enhances swift light movement on or off the trail. If I can't find it, I'll build it.
Fill a need. That's the underlying motivation for developing gear. That's what led me to going through the pains of making, or in fact having someone else make, the B4 for me. I don't want to do it, it's a pain to make things, especially if you don't have the tools. I'd rather go buy something that works. The problem arises when there's nothing out there to buy, or inadequate products that come up short for specific needs.
Carrying Cameras: The simplest thing to do is carry the camera in the pack, but we all know that stopping to get something out of your pack is a pain, especially if it's an unexpected wildlife shot. "Hold on bear, don't fly away woodpecker, freeze right there Mr. Elk, don't buzz away Ms bee...." doesn't quite work. I've been carrying cameras in front packs for a while. When I say cameras I mean video cameras. At first it was a sizeable Canon G2 and more recently a Panasonic GH2 DSLR along with a Canon HF100 handycam and the small Contour helmetcam, all at once. My rigs have been adequate, utilizing a Lowe lens case and more recently a Lowe shoulder harness system.

Camera mess: GH2, helmet cams and H100 video camera
These systems worked OK in that I had access to all my gear, but involved some problems; the system on the left hung down a bit and my knees would hit it when I was climbing, plus it needed a pack with a hip belt to keep it in place. The neck strap wasn't very comfortable after hours on the trail. The system on the right didn't ride quite right and tended to flop out on the top. It also fatigued my shoulders after awhile what with the cumbersome harness underneath my pack straps. None of these systems are geared towards backpacking in general, and light weight fastpacking in particular. The harness system was bulky with metal clips and wasn't designed to be worn under a pack. The padding is somewhat overkill (I guess you could argue that there is no overkill when it comes to protecting a sizeable investment), the materials are not waterproof or dustproof, and the systems are too heavy.
Enter ZPacks to the rescue. Joe Valesko recently introduced a chest pack constructed of a hybrid material combining cuben fiber and nylon, making for an extremely tough, waterproof but light material. I had him make me one that had more volume to accommodate my GH2 width and add buckles to my Zero pack so that it would be totally secure. All I had to do was make a padded insert to hold my cameras in place. Now I have a waterproof case that rides nicely in the front that requires no extra straps beyond those used to secure the frontpack to the backpack. If you're interested in this arrangement or need some other size, contact Joe and let him know your needs.
Making the insert was really rather easy. I went to a local craft store and bought some sheets of hard foam at $.99 each, one roll of tan colored duct tape, and one package of bubble wrap. It was then just a matter of sitting down with scissors and an exacto knife and constructing the box that would fit into the pack.3/4 foam and duct tape box, sized to fit 3 cameras
I did have a little trial and error, at first making the box a bit too tight to fit into the chest pack. I removed one side and cut the appropriate parts down, experimenting until I got the perfect fit. Then it was a matter of taping the side back on.
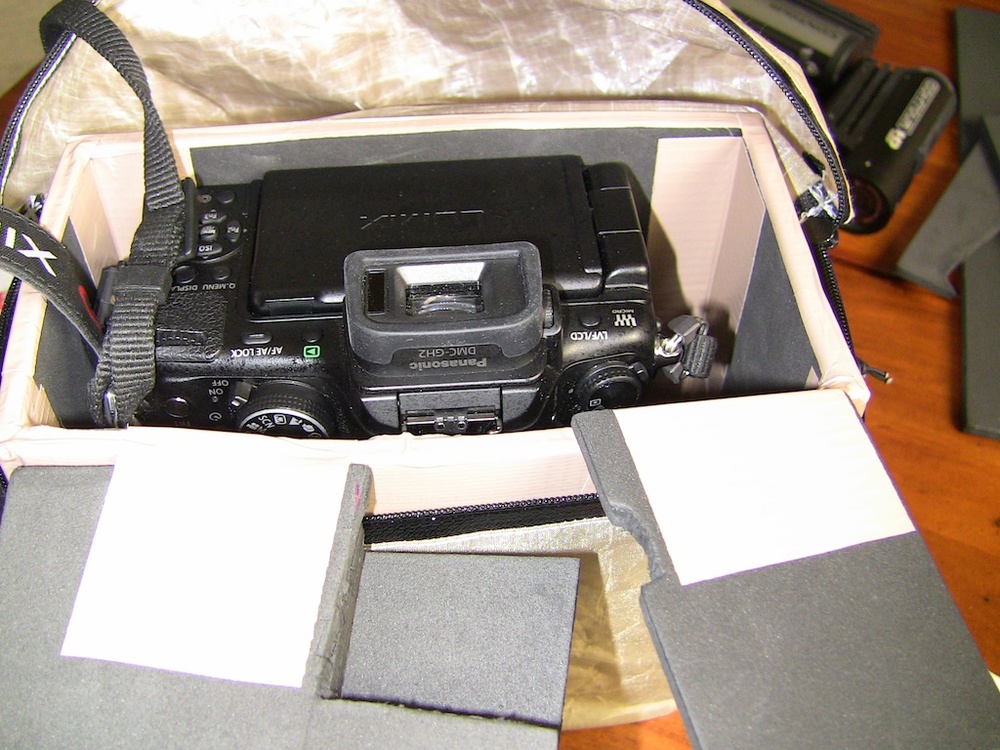
I wanted 3 cameras to fit into this pack, with my Panasonic GH2 being the primary concern. I opted to center it for balance and use the volume on either side of the lens for my 2 Contour helmetcams. I inserted a small piece of curved foam to cradle the newer Contour +, which has a lens cover and allows it to nestle quite securely in the cradle. To help protect my GH2 and to get the optimum elevation, I folded over some bubble wrap inserted into a plastic baggie, then taped up to lie in the bottom of the case. I also doubled the foam on the bottom where the lens rests. My thinking here was maximum protection from bottom impact as there is no give (except for the foam) on this one part of the arrangement. Every other angle has a sort of built in "crush zone."

Cameras inside case/internal partitions

Case without lid inside front pack
Now all I had to do was construct a lid to protect the top of the camera case, in particular the eye piece of the GH2. I opted to do a split lid design, swinging outward so as not to interfere with the chest pack lid. I split them as the case is slightly bowed; this way the split lids could swing with no crimping. Construction was still simple foam board cut with scissors and an exacto knife and some smaller pieces super glued together. Duct tape makes the hinges.

Lids open

Lids closed, protecting eye piece


lids closed, protecting eye piecelids closed as backpacker would see it

Lids open away from the body
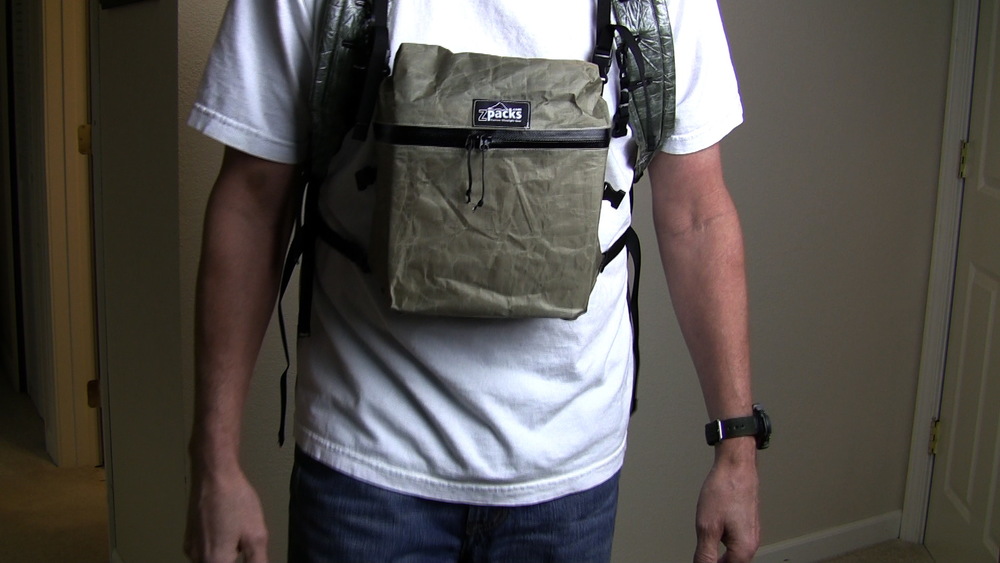
I ran around with the pack/camera chest pack configuration and I can say it is much more comfortable and stable than any of the other configurations I've used in the past. It balances nicely and doesn't flop forward. I don't need a waist belt to use it. It doesn't obstruct my vision too much when looking down. It's sturdy, light, and waterproof. If I'm not carrying larger cameras, I can simply remove the insert and use the chest pack for food, maps, other electronics, clothing or water (multiuse is always good). If I want a new configuration, I just get out the foam, duct tape and superglue and customize away. If I don't want to carry the chest pack, I simply remove the straps and buckles that secure them to my pack.
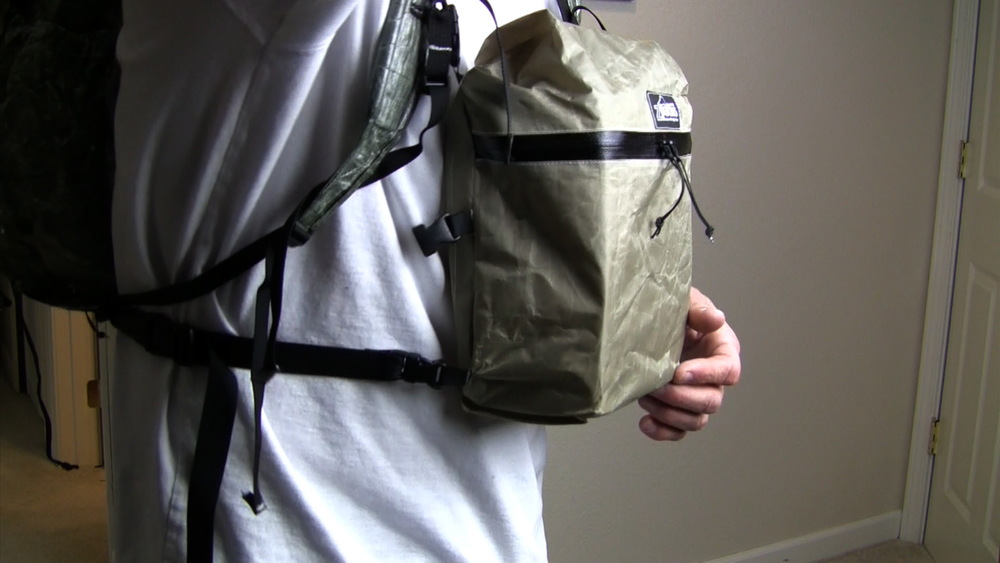
Secure with removable straps; no flopping! Easy access to cameras
For more information on the ZPacks chest pack, visit Joe's website. I will reiterate that he will work with you if you need something resized or custom made, and he specializes in cuben fiber (Update: ZPacks no longer does custom work). Finding a homegrown custom pack/tent/bag/accessories maker is right on par with finding a good mechanic and/or barber. Their worth is greater than the money you pay them.
finally, the perfect camera case for this fastpacker!